Table of Contents
If you follow Android SeekBar example , you will see below screen.

We will customize above SeekBar and it will look as below after customization.

If you want to customize above SeekBar , you can follow below tutorial to create Custom SeekBar it.
Source code:
Step 1 :Creating Project
Create an android application project named “AndroidCustomSeekBarExampleApp”.
Step 2 : Creating Layout
Change res ->layout -> activity_main.xml as below:
|
1 2 3 4 5 6 7 8 9 10 11 12 13 14 15 16 17 18 19 20 21 22 23 24 25 26 27 28 29 30 31 32 33 34 35 |
<RelativeLayout xmlns:android="http://schemas.android.com/apk/res/android" xmlns:tools="http://schemas.android.com/tools" android:layout_width="match_parent" android:layout_height="match_parent" android:paddingBottom="@dimen/activity_vertical_margin" android:paddingLeft="@dimen/activity_horizontal_margin" android:paddingRight="@dimen/activity_horizontal_margin" android:paddingTop="@dimen/activity_vertical_margin" tools:context="com.java2blog.customseekbarexampleapp.MainActivity" > <SeekBar android:id="@+id/seekBar" android:layout_width="300dp" android:layout_height="wrap_content" android:layout_alignParentLeft="true" android:layout_alignParentTop="true" android:layout_marginTop="40dp" android:max="10" android:thumb="@drawable/thumb" android:secondaryProgress="5" android:progress="5" android:progressDrawable="@layout/progress_seekbar" /> <TextView android:id="@+id/textView" android:layout_width="wrap_content" android:layout_height="wrap_content" android:layout_alignParentLeft="true" android:layout_below="@+id/seekBar" android:layout_marginLeft="29dp" android:layout_marginTop="14dp" /> </RelativeLayout> |
If you notice, it has two new attributes android:thumb=”@drawable/thumb” and android:progressDrawable=”@layout/progress_seekbar”. You will understand more about it in further steps.
Step 3: Create thumb and put it in drawable folder :

Step 4 : Creating XML for drawing progress bar :
- Go to res -> layout
- right click on layout
- Click on New -> File.
- Create a file named “progress_seekbar.xml” and paste below code in row_item.xml.
|
1 2 3 4 5 6 7 8 9 10 11 12 13 14 15 16 17 18 19 20 21 22 23 24 25 26 27 28 29 30 31 |
<?xml version="1.0" encoding="utf-8"?> <layer-list xmlns:android="http://schemas.android.com/apk/res/android" android:layout_width="match_parent" android:layout_height="match_parent" > <item> <shape android:shape="rectangle" > <corners android:radius="10dp"/> <gradient android:angle="270" android:endColor="#252945" android:startColor="#8a834b" /> </shape> </item> <item> <clip> <shape android:shape="rectangle" > <corners android:radius="10dp" /> <gradient android:angle="270" android:endColor="#990800" android:startColor="#d14900" /> </shape> </clip> </item> </layer-list> |
Step 5 : Creating MainActivity
Change src/main/packageName/MainActivity.java as below:
|
1 2 3 4 5 6 7 8 9 10 11 12 13 14 15 16 17 18 19 20 21 22 23 24 25 26 27 28 29 30 31 32 33 34 35 36 37 38 39 40 41 42 43 44 45 46 47 48 49 |
package com.java2blog.customseekbarexampleapp; import android.app.Activity; import android.os.Bundle; import android.widget.SeekBar; import android.widget.TextView; import android.widget.SeekBar.OnSeekBarChangeListener; import com.java2blog.customseekbarexampleapp.R; import static com.java2blog.customseekbarexampleapp.R.id.seekBar; import static com.java2blog.customseekbarexampleapp.R.id.textView; public class MainActivity extends Activity { SeekBar customSeekbar; TextView textView; @Override protected void onCreate(Bundle savedInstanceState) { super.onCreate(savedInstanceState); setContentView(R.layout.activity_main); customSeekbar = (SeekBar) findViewById(R.id.seekBar); textView = (TextView) findViewById(R.id.textView); // Set default value to 0 textView.setText("Progress : "+customSeekbar.getProgress() + "/" + customSeekbar.getMax()); customSeekbar.setOnSeekBarChangeListener( new OnSeekBarChangeListener() { int progress = 0; @Override public void onProgressChanged(SeekBar seekBar, int progresValue, boolean fromUser) { progress = progresValue; } @Override public void onStartTrackingTouch(SeekBar seekBar) { } @Override public void onStopTrackingTouch(SeekBar seekBar) { // Display the value in textview textView.setText("Progress : "+progress + "/" + seekBar.getMax()); } }); } } |
We are getting widget reference from layout file and then using SeekBar’s setOnSeekBarChangeListener method to set listener for our custom seekbar.
Step 6 : Running the app
When you run the app, you will get below screen:
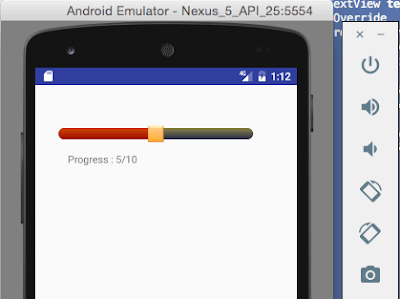
Drag ping circle and use it to set the value for SeekBar.
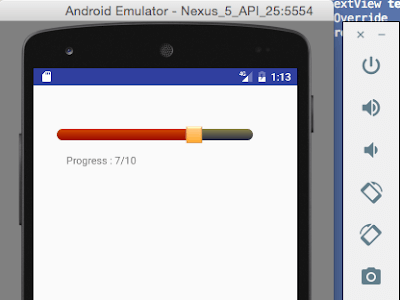
We are done with Android Custom SeekBar example.
Happy Android Learning !!