Table of Contents
In this tutorial , we are going to see Android SeekBar example.

SeekBar is extension of ProgressBar. You can drag cursor left or right to select correct value. It is generally used in setting brightness or music progress or setting sound.
It is very easy to create SeekBar in Android. Just follow below steps to create SeekBar.
Source code:
Step 1 :Creating Project
Create an android application project named “SeekBarExampleApp”.
Step 2 : Creating Layout
Change res ->layout -> activity_main.xml as below:
|
1 2 3 4 5 6 7 8 9 10 11 12 13 14 15 16 17 18 19 20 21 22 23 24 25 26 27 28 29 30 31 |
<?xml version="1.0" encoding="utf-8"?> <RelativeLayout xmlns:android="http://schemas.android.com/apk/res/android" xmlns:tools="http://schemas.android.com/tools" android:id="@+id/activity_main" android:layout_width="match_parent" android:layout_height="match_parent" android:paddingBottom="@dimen/activity_vertical_margin" android:paddingLeft="@dimen/activity_horizontal_margin" android:paddingRight="@dimen/activity_horizontal_margin" android:paddingTop="@dimen/activity_vertical_margin" tools:context="com.java2blog.seekbarexampleapp.MainActivity"> <SeekBar android:layout_width="300dp" android:layout_height="wrap_content" android:layout_alignParentLeft="true" android:layout_alignParentTop="true" android:layout_marginTop="40dp" android:max="10" android:id="@+id/seekBar" /> <TextView android:id="@+id/textView" android:layout_width="wrap_content" android:layout_height="wrap_content" android:layout_alignParentLeft="true" android:layout_below="@+id/seekBar" android:layout_marginLeft="29dp" android:layout_marginTop="14dp" /> </RelativeLayout> |
Step 3 : Creating MainActivity
Change src/main/packageName/MainActivity.java as below:
|
1 2 3 4 5 6 7 8 9 10 11 12 13 14 15 16 17 18 19 20 21 22 23 24 25 26 27 28 29 30 31 32 33 34 35 36 37 38 39 40 41 42 43 44 |
package com.java2blog.seekbarexampleapp; import android.support.v7.app.AppCompatActivity; import android.os.Bundle; import android.widget.SeekBar; import android.widget.TextView; import android.widget.SeekBar.OnSeekBarChangeListener; public class MainActivity extends AppCompatActivity { private SeekBar seekBar; private TextView textView; @Override protected void onCreate(Bundle savedInstanceState) { super.onCreate(savedInstanceState); setContentView(R.layout.activity_main); seekBar = (SeekBar) findViewById(R.id.seekBar); textView = (TextView) findViewById(R.id.textView); // Set default value to 0 textView.setText(seekBar.getProgress() + "/" + seekBar.getMax()); seekBar.setOnSeekBarChangeListener( new OnSeekBarChangeListener() { int progress = 0; @Override public void onProgressChanged(SeekBar seekBar, int progresValue, boolean fromUser) { progress = progresValue; } @Override public void onStartTrackingTouch(SeekBar seekBar) { } @Override public void onStopTrackingTouch(SeekBar seekBar) { // Display the value in textview textView.setText("Progress : "+progress + "/" + seekBar.getMax()); } }); } } |
We are getting widget reference from layout file and then using SeekBar’s setOnSeekBarChangeListener method to set listener for our seekbar.
Step 4 : Running the app
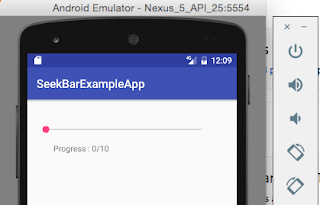
When you run the app, you will get below screen:

Drag ping circle and use it to set the value for SeekBar.


We are done with Android SeekBar example.
Happy Android Learning !!
Was this post helpful?
Let us know if this post was helpful. Feedbacks are monitored on daily basis. Please do provide feedback as that\'s the only way to improve.


