Table of Contents
ListView is the view in which you arrange your list items in vertical order.
For example:

It is very popular widget which is used almost in every application. In this post, I am going to create a very simple list view . If you want to create a some what complex Listview which have images and text in same row , you can go through Android Custom ListView example.
Source code:
Step 1 :Creating Project
Create an android application project named “AndroidListViewExampleApp”.
Step 2 : Creating Layout
Change res ->layout -> activity_main.xml as below:
|
1 2 3 4 5 6 7 8 9 10 11 12 13 14 15 16 17 18 19 |
<?xml version="1.0" encoding="utf-8"?> <RelativeLayout xmlns:android="http://schemas.android.com/apk/res/android" xmlns:tools="http://schemas.android.com/tools" android:id="@+id/activity_main" android:layout_width="match_parent" android:layout_height="match_parent" android:paddingBottom="@dimen/activity_vertical_margin" android:paddingLeft="@dimen/activity_horizontal_margin" android:paddingRight="@dimen/activity_horizontal_margin" android:paddingTop="@dimen/activity_vertical_margin" tools:context="com.java2blog.androidlistviewexampleapp.MainActivity"> <ListView android:id="@+id/android:list" android:layout_width="match_parent" android:layout_height="wrap_content" /> </RelativeLayout> |
Step 3 : Creating MainActivity
Change src/main/packageName/MainActivity.java as below:
|
1 2 3 4 5 6 7 8 9 10 11 12 13 14 15 16 17 18 19 20 21 22 23 24 25 26 27 28 29 30 31 32 33 34 35 36 37 38 |
package com.java2blog.androidlistviewexampleapp; import android.app.ListActivity; import android.graphics.Typeface; import android.support.v7.app.AppCompatActivity; import android.os.Bundle; import android.util.TypedValue; import android.view.View; import android.widget.ArrayAdapter; import android.widget.ListView; import android.widget.TextView; import android.widget.Toast; public class MainActivity extends ListActivity { String[] listofCountries={"India","China","Nepal","Bhutan"}; @Override protected void onCreate(Bundle savedInstanceState) { super.onCreate(savedInstanceState); setContentView(R.layout.activity_main); setListAdapter(new ArrayAdapter(this, android.R.layout.simple_list_item_1, listofCountries)); TextView textView = new TextView(this); textView.setTypeface(Typeface.DEFAULT_BOLD); textView.setText("List of Countries"); ListView listView=(ListView)findViewById(android.R.id.list); listView.addHeaderView(textView); } @Override protected void onListItemClick(ListView l, View v, int position, long id) { super.onListItemClick(l, v, position, id); Toast.makeText(this, "You have selected : " + listofCountries[position-1]+ " as country", Toast.LENGTH_LONG).show(); } } |
If you notice closely, our MainActivity extends ListActivity as ListActivity has some method specifically for ListView.
|
1 2 3 |
setListAdapter(new ArrayAdapter(this, android.R.layout.simple_list_item_1, listofCountries)); |
Whenever we create ListView, we need to provide ArrayAdapter which sets view for each row and also we need to provide a file which defines layout of each Row. In this example, we are using android.R.layout.simple_list_item_1 which is android’s predefined layout file .
Step 4 : Running the app
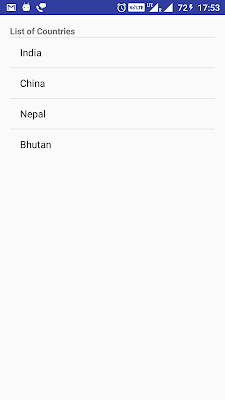
When you run the app, you will get below screen:

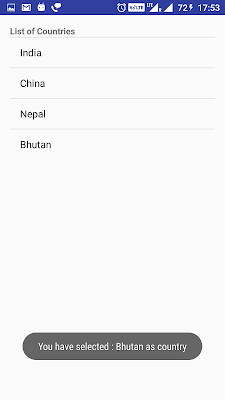
When you click on Bhutan , you will get below screen

We are done with Android Simple ListView example.
Happy Android Learning !!


