Table of Contents
Android ToggleButton is UI widget which has only two states i.e. ON and OFF. It allows user to change setting between these two states.
Example :
You can use these button to change On and Off state of WiFi or Bluetooth


Example :
You can use these button to change On and Off state of WiFi or Bluetooth
Source code:
Step 1 :Creating Project
Create an android application project named “ToggleButtonExampleApp”.
Step 2 : Creating Layout
Change res ->layout -> activity_main.xml as below:
|
1 2 3 4 5 6 7 8 9 10 11 12 13 14 15 16 17 18 19 20 21 22 |
<?xml version="1.0" encoding="utf-8"?> <RelativeLayout xmlns:android="http://schemas.android.com/apk/res/android" xmlns:tools="http://schemas.android.com/tools" android:id="@+id/activity_main" android:layout_width="match_parent" android:layout_height="match_parent" android:paddingBottom="@dimen/activity_vertical_margin" android:paddingLeft="@dimen/activity_horizontal_margin" android:paddingRight="@dimen/activity_horizontal_margin" android:paddingTop="@dimen/activity_vertical_margin" android:gravity="center_horizontal" tools:context="com.java2blog.togglebuttonexampleapp.MainActivity"> <ToggleButton android:id="@+id/toggleButton1" android:layout_width="wrap_content" android:layout_height="wrap_content" android:text="ToggleButton" > </ToggleButton> </RelativeLayout> |
Step 3 : Creating MainActivity
Change src/main/packageName/MainActivity.java as below:
|
1 2 3 4 5 6 7 8 9 10 11 12 13 14 15 16 17 18 19 20 21 22 23 24 25 26 27 28 29 30 31 32 33 34 35 36 37 38 39 40 41 |
package com.java2blog.togglebuttonexampleapp; import android.app.Activity; import android.support.v7.app.AppCompatActivity; import android.os.Bundle; import android.view.View; import android.widget.Toast; import android.widget.ToggleButton; import android.view.View.OnClickListener; import static android.webkit.WebSettings.PluginState.ON; public class MainActivity extends AppCompatActivity { ToggleButton toggleButton; private Activity activity; @Override protected void onCreate(Bundle savedInstanceState) { super.onCreate(savedInstanceState); setContentView(R.layout.activity_main); activity = this; toggleButton = (ToggleButton) findViewById(R.id.toggleButton1); toggleButton.setOnClickListener(new OnClickListener() { @Override public void onClick(View v) { // TODO Auto-generated method stub if (toggleButton.isChecked()) { Toast.makeText(activity, "Toggle button is in ON State", Toast.LENGTH_LONG).show(); } else { Toast.makeText(activity, "Toggle button is in OFF State", Toast.LENGTH_LONG).show(); } } }); } } |
We are getting toggle reference from layout file and then using ToggleButton’s setOnClickListener to register event for state change.
ToggleButton’s isChecked() method is used to know current state of ToggleButton whether it is on state or off state.
ToggleButton’s isChecked() method is used to know current state of ToggleButton whether it is on state or off state.
Step 4 : Running the app
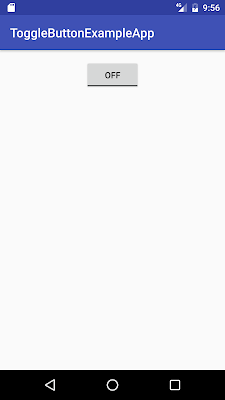
When you run the app, you will get below screen:

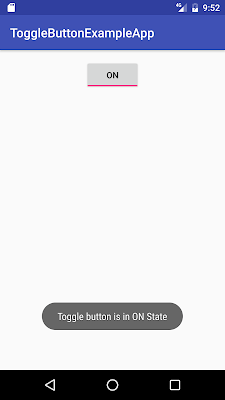
When you click on toggle button, it will go to on state.

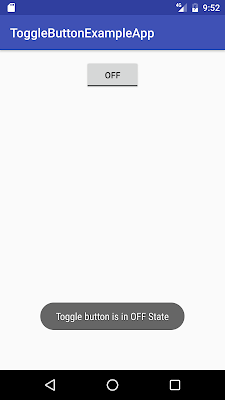
When you again click on toggle button, it will go to off state.

We are done with Android ToggleButton example. Please comment if you are facing any issue with the code.
Was this post helpful?
Let us know if this post was helpful. Feedbacks are monitored on daily basis. Please do provide feedback as that\'s the only way to improve.


