Table of Contents
- 1. Introduction
- 2. Understanding the Error
- 3. Comprehensive Solutions to Resolve the Error
- 3.1. Update the Java Runtime Environment (JRE)
- 3.2. Recompile the Java Program
- 3.3. Change Project SDK in IntelliJ IDEA
- 3.4. Update IDE and Plugins
- 3.5. Set Java Version in Andorid studio/Intellij Idea with gradle
- 3.6. Configure Build Tools
- 3.7. Use jdeps for Compatibility Analysis
- 3.8. Use Tools for Compatibility
- 3.9. Configure Environment Variables
- 3.10. Use SDKMAN! for Java Version Management
- 3.11. Create a Fat Jar with Dependencies
- 4. Conclusion
1. Introduction
Java developers often face the challenge of compatibility issues, such as the unsupported class file major version 61" error. This problem arises when a Java program, compiled with Java 17 (denoted by major version 61), is run on a Java version that’s older than Java 17. This guide is crafted to be beginner-friendly and will walk you through various solutions to resolve this issue.
2. Understanding the Error
Unsupported class file major version 61 indicates a mismatch between the Java version used for compiling and running the program. Each Java version corresponds to a major version number (Java 17 is 61), and the Java Virtual Machine (JVM) expects compatibility between these versions during execution.
3. Comprehensive Solutions to Resolve the Error
3.1. Update the Java Runtime Environment (JRE)
Why It Works: Updating the JRE ensures that the Java version used to run the program matches or exceeds the version used for compiling it.
Steps:
-
- Check Your Current Version:
- Open a command prompt or terminal.
- Type
java -version.
- Download and Install Java 17:
- Visit the Oracle Java download page.
- Choose the appropriate installer for your operating system and follow the installation steps.
- Check Your Current Version:
- Verify the Update:
- Run
java -versionagain to check the new version.
- Run
3.2. Recompile the Java Program
Why It Works: Recompiling the program with a Java version that matches your runtime environment eliminates the version mismatch.
Steps:
- Install an Older JDK:
- Download a JDK version that matches your runtime environment from the Oracle website.
- Recompile Your Program:
- In the terminal, navigate to your program’s directory.
- Use
javac YourProgramName.javato recompile. - Run the program with
java YourProgramName.
3.3. Change Project SDK in IntelliJ IDEA
Why It Works: IntelliJ IDEA might be using a different Java version for compiling your project.
Steps:
- Open Project Structure:
- In IntelliJ, go to
File>Project Structure.
- In IntelliJ, go to
- Adjust SDK:
- In the
Projectsection, change theProject SDKto Java 17 or the version you’re using.
- In the
- Rebuild the Project:
- Use
Build>Rebuild Project.
- Use
3.4. Update IDE and Plugins
Why It Works: Outdated IDEs or plugins might not support newer Java versions.
Steps:
- Check for Updates:
- In your IDE, look for the option to check for updates (usually in the
HelporFilemenu).
- In your IDE, look for the option to check for updates (usually in the
- Update:
- Update the IDE and any Java-related plugins.
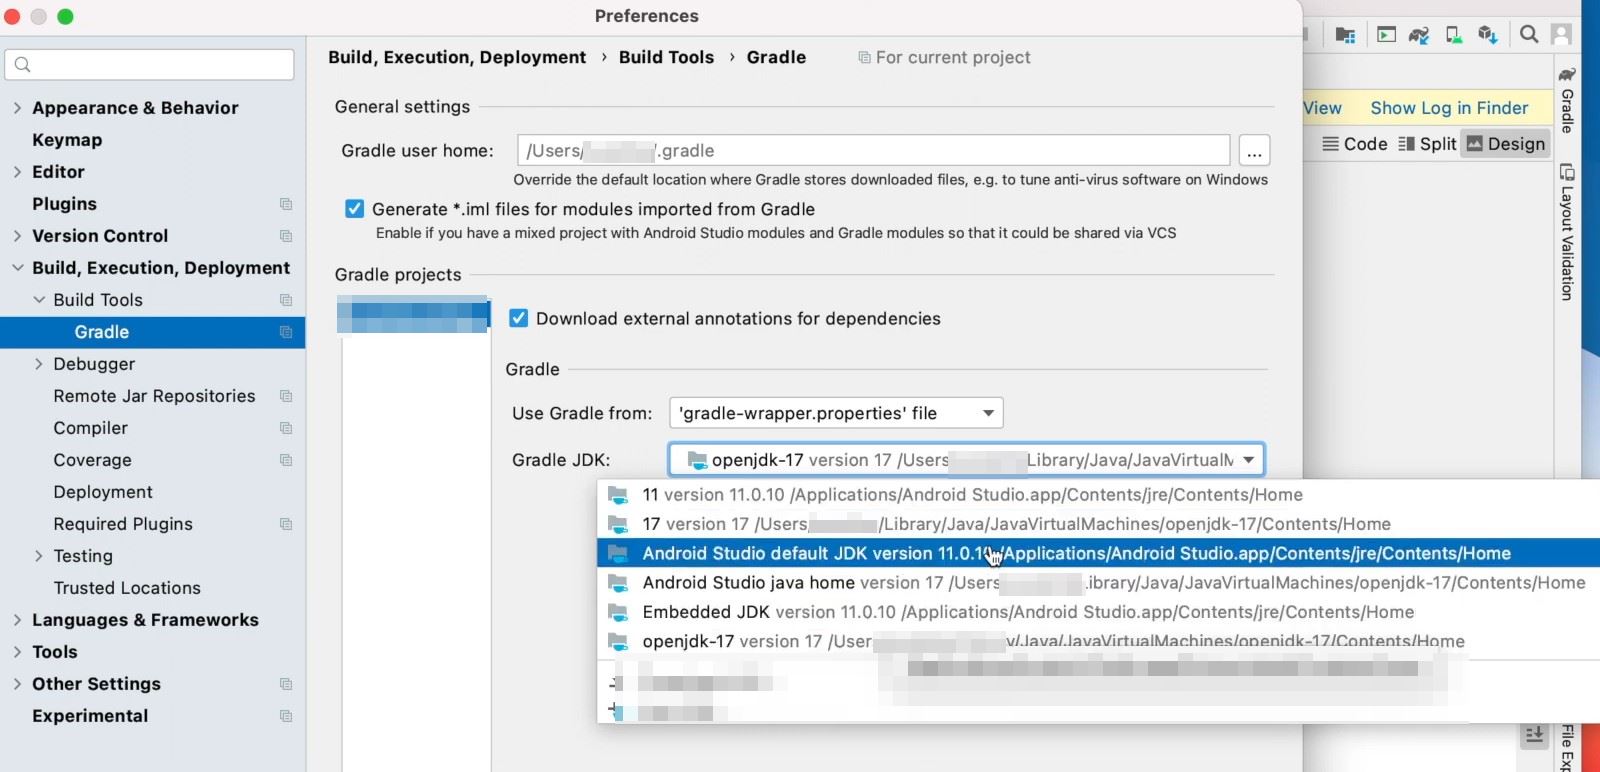
3.5. Set Java Version in Andorid studio/Intellij Idea with gradle
if you are getting this issue with gradle in Android studio/Intellij IDE. You can follow below steps to resolve this.
- Go to
Android Studio --> Preferences. - Go to
Build, Execution, Deployment --> Build Tools -->Gradle. - Change the Java version to either
Android Studio default JDKorEmbedded JDK.
You can also try to upgrade the gradle version to fix this issue.
3.6. Configure Build Tools
Why It Works: Specifying the Java version in build tools like Maven or Gradle ensures consistency during compilation.
For Maven (pom.xml):
Set the Java version for maven in the maven-compiler-plugin configuration.
For Gradle (build.gradle):
Use sourceCompatibility and targetCompatibility to specify the Java version in gradle.
3.7. Use jdeps for Compatibility Analysis
jdeps is a command-line tool included in the JDK that analyzes Java class files and determines their dependencies, including which version of Java they require. This can be particularly useful when you’re trying to understand the compatibility of various parts of your application.
How to Use jdeps:
- Check if JDK is Installed:
- Ensure you have the JDK installed as
jdepscomes with it. You can verify this by typingjava -versionandjavac -versionin your command prompt or terminal.
- Ensure you have the JDK installed as
- Run jdeps on Your Java File or JAR:
- Open the command prompt or terminal.
- Navigate to the directory where your Java file or JAR file is located.
- Run
jdepswith the name of your Java file or JAR file. For example,jdeps MyProgram.jarorjdeps MyProgram.class.
- Analyze the Output:
jdepswill output information about the dependencies of your Java file or JAR, including which version of Java they require.- Look for lines indicating dependencies on specific Java versions. This will help you understand the minimum Java version required to run your program.
- Decide on the Next Steps:
- If
jdepsshows dependencies that require a newer Java version than what you have, consider updating your Java version. - If updating Java isn’t possible, try to modify your code or change dependencies to be compatible with your current Java version.
- If
Example of Using jdeps:
Suppose you have a file named MyProgram.class. In your terminal, you would run:
|
1 2 3 |
jdeps MyProgram.class |
This command will give you a detailed output about the class file, including the Java version required by each dependency it has.
3.8. Use Tools for Compatibility
Sometimes, you can use certain tools to make your Java class files compatible with older Java versions. A popular tool for this purpose is Javac with the --release option. This tool allows you to compile your Java programs for a specific Java version.
Steps:
- Install the Latest JDK:
- First, ensure you have the latest JDK installed. You can download it from the Oracle Java download page.
- Recompile Your Program for an Older Java Version:
- Open the command prompt or terminal.
- Navigate to your Java program’s directory.
- Use the Javac tool with the
--releaseoption followed by the target Java version. For example, if you want to compile for Java 11, usejavac --release 11 YourProgramName.java.
- Run Your Program:
- Now, try running your program again using
java YourProgramName.
- Now, try running your program again using
This method allows you to create a Java program compatible with older versions without needing to install those versions.
3.9. Configure Environment Variables
Why It Works: Correct environment variables ensure that the system uses the intended Java version.
Steps:
- Set JAVA_HOME:
- Make sure
JAVA_HOMEpoints to the JDK directory.
- Make sure
- Update PATH:
- Add the JDK
bindirectory to yourPATHenvironment variable.
- Add the JDK
3.10. Use SDKMAN! for Java Version Management
Why It Works: SDKMAN! allows easy switching between different Java versions.
Steps:
- Install SDKMAN!:
- Visit SDKMAN!’s website and follow the installation instructions.
- Switch Java Versions:
- Use
sdk list javaandsdk use java <version>to switch between Java versions.
- Use
3.11. Create a Fat Jar with Dependencies
Creating a fat jar, which includes all dependencies, makes your application more versatile and less dependent on the environment.
Using Maven:
- Edit
pom.xml:- Add the
maven-assembly-pluginconfiguration to yourpom.xml.
- Add the
- Build the Fat Jar:
- Run
mvn clean compile assembly:singlein your project directory.
- Run
Using Gradle:
-
- Edit
build.gradle:- Include the necessary configuration for creating a fat jar in your
build.gradle.
- Include the necessary configuration for creating a fat jar in your
- Build the Fat Jar:
- Execute
gradle buildto create the jar.
- Execute
- Edit
4. Conclusion
The “unsupported class file major version 61” error in Java is a common issue that stems from version incompatibility. By updating your Java version, recompiling the program, using an IDE, employing compatibility tools, creating a fat jar, keeping your IDE up-to-date, or managing versions with SDKMAN!, you can efficiently resolve this error. Each method offers a way to align your development environment with the Java version requirements of your project, ensuring smooth operation and execution of your Java applications.