Table of Contents
In this post, we are going to see how to create Spring boot AngularJS example.
We will use Spring boot 1.5.3 Release version, it comes with hibernate 5. We will create a Spring boot AngularJS application which will have AngularJS as user interface. It will provide user interface from which you can add, update or delete customer database.We will use controller, services and DAO classes to achieve these functionalities. We will connect to MySQL database using SessionFactory class of hibernate.
Github Source code:
Spring Boot AngularJS example:
Here are steps to create a Spring boot AngularJS example.
Project structure:
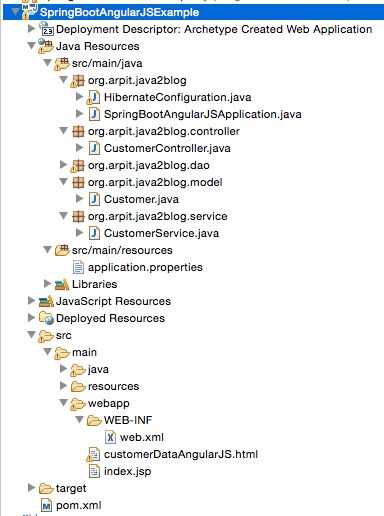
Tools used for creating below project:
- Spring Boot 1.5.3.RELEASE
- Spring 4.3.8.RELEASE
- Tomcat Embed 8
- Maven 3
- Java 8
- Eclipse
- Hibernate 5.3.5
- MySQL 5.7.18
Step 1: Create a dynamic web project using maven in eclipse named “SpringBootAngularJSExample”.
Step 2: Change “pom.xml” as below:
|
1 2 3 4 5 6 7 8 9 10 11 12 13 14 15 16 17 18 19 20 21 22 23 24 25 26 27 28 29 30 31 32 33 34 35 36 37 38 39 40 41 42 43 44 45 46 47 48 49 50 51 52 |
<project xmlns="http://maven.apache.org/POM/4.0.0" xmlns:xsi="http://www.w3.org/2001/XMLSchema-instance" xsi:schemaLocation="http://maven.apache.org/POM/4.0.0 http://maven.apache.org/maven-v4_0_0.xsd"> <modelVersion>4.0.0</modelVersion> <groupId>org.arpit.java2blog</groupId> <artifactId>SpringBootHibernateExample</artifactId> <version>0.0.1-SNAPSHOT</version> <name>SpringBootHibernateExample Maven Webapp</name> <url>http://maven.apache.org</url> <parent> <groupId>org.springframework.boot</groupId> <artifactId>spring-boot-starter-parent</artifactId> <version>1.5.3.RELEASE</version> </parent> <dependencies> <dependency> <groupId>org.springframework.boot</groupId> <artifactId>spring-boot-starter-web</artifactId> </dependency> <dependency> <groupId>org.springframework.boot</groupId> <artifactId>spring-boot-starter-data-jpa</artifactId> </dependency> <dependency> <groupId>mysql</groupId> <artifactId>mysql-connector-java</artifactId> </dependency> <!-- JSTL for JSP --> <dependency> <groupId>javax.servlet</groupId> <artifactId>jstl</artifactId> </dependency> <!-- For JSP compilation --> <dependency> <groupId>org.apache.tomcat.embed</groupId> <artifactId>tomcat-embed-jasper</artifactId> <scope>provided</scope> </dependency> <!-- https://mvnrepository.com/artifact/org.threeten/threetenbp --> <dependency> <groupId>org.threeten</groupId> <artifactId>threetenbp</artifactId> <version>0.7.2</version> </dependency> </dependencies> <build> <finalName>SpringBootHibernateExample</finalName> </build> </project> |
The spring-boot-starter-parent provides you all maven defaults required for any spring project.
Since we are developing a web application, we also need to add spring-boot-starter-web dependency and also we need to include pring-boot-starter-data-jpa to run this application with hibernate.You need to also put mysql-connector-java for MySql JDBC driver. If you are using any other database, you need to use different database connector.
Let’s do hibernate configuration first.
Hibernate Configuration
Step 3: Create a file named “HibernateConfiguration.java” in package .org.arpit.java2blog
|
1 2 3 4 5 6 7 8 9 10 11 12 13 14 15 16 17 18 19 20 21 22 23 24 25 26 27 28 29 30 31 32 33 34 35 36 37 38 39 40 41 42 43 44 45 46 47 48 49 50 51 52 53 54 55 56 57 58 59 60 61 62 63 64 65 66 67 68 69 70 71 72 73 74 75 76 |
package org.arpit.java2blog; import java.util.Properties; import javax.sql.DataSource; import org.springframework.beans.factory.annotation.Value; import org.springframework.boot.orm.jpa.EntityManagerFactoryBuilder; import org.springframework.context.annotation.Bean; import org.springframework.context.annotation.Configuration; import org.springframework.jdbc.datasource.DriverManagerDataSource; import org.springframework.orm.hibernate5.HibernateTransactionManager; import org.springframework.orm.hibernate5.LocalSessionFactoryBean; import org.springframework.orm.jpa.LocalContainerEntityManagerFactoryBean; import org.springframework.orm.jpa.vendor.HibernateJpaVendorAdapter; import org.springframework.transaction.annotation.EnableTransactionManagement; @Configuration @EnableTransactionManagement public class HibernateConfiguration { @Value("${db.driver}") private String DRIVER; @Value("${db.password}") private String PASSWORD; @Value("${db.url}") private String URL; @Value("${db.username}") private String USERNAME; @Value("${hibernate.dialect}") private String DIALECT; @Value("${hibernate.show_sql}") private String SHOW_SQL; @Value("${hibernate.hbm2ddl.auto}") private String HBM2DDL_AUTO; @Value("${entitymanager.packagesToScan}") private String PACKAGES_TO_SCAN; @Bean public DataSource dataSource() { DriverManagerDataSource dataSource = new DriverManagerDataSource(); dataSource.setDriverClassName(DRIVER); dataSource.setUrl(URL); dataSource.setUsername(USERNAME); dataSource.setPassword(PASSWORD); return dataSource; } @Bean public LocalSessionFactoryBean sessionFactory() { LocalSessionFactoryBean sessionFactory = new LocalSessionFactoryBean(); sessionFactory.setDataSource(dataSource()); sessionFactory.setPackagesToScan(PACKAGES_TO_SCAN); Properties hibernateProperties = new Properties(); hibernateProperties.put("hibernate.dialect", DIALECT); hibernateProperties.put("hibernate.show_sql", SHOW_SQL); hibernateProperties.put("hibernate.hbm2ddl.auto", HBM2DDL_AUTO); sessionFactory.setHibernateProperties(hibernateProperties); return sessionFactory; } @Bean public HibernateTransactionManager transactionManager() { HibernateTransactionManager transactionManager = new HibernateTransactionManager(); transactionManager.setSessionFactory(sessionFactory().getObject()); return transactionManager; } } |
Above class is annotated with @Configuration and @Bean annotation. These annotations are used to define bean in Spring.
@Configuration is analogous to <beans> tag in Spring XML configuration and @Bean is analogous to <bean> tag.
@Value annotation is used to inject variables from properties files. In this case, it will read from application.properties which we are going to create in next step.
Step 4: Create a file named “application.properties” in package /src/main/resources
|
1 2 3 4 5 6 7 8 9 10 11 12 13 14 15 16 |
logging.level=DEBUG # Database db.driver: com.mysql.jdbc.Driver db.url: jdbc:mysql://localhost:3306/CustomerData db.username: root db.password: admin # Hibernate hibernate.dialect: org.hibernate.dialect.MySQL5Dialect hibernate.show_sql: true hibernate.hbm2ddl.auto: create entitymanager.packagesToScan: org spring.jpa.properties.hibernate.enable_lazy_load_no_trans=true |
Model class
Step 5: Create a file named “Customer.java” in package .org.arpit.java2blog.model
|
1 2 3 4 5 6 7 8 9 10 11 12 13 14 15 16 17 18 19 20 21 22 23 24 25 26 27 28 29 30 31 32 33 34 35 36 37 38 39 40 41 42 43 44 45 46 47 48 49 50 51 52 53 54 55 56 57 |
package org.arpit.java2blog.model; import javax.persistence.Column; import javax.persistence.Entity; import javax.persistence.GeneratedValue; import javax.persistence.GenerationType; import javax.persistence.Id; import javax.persistence.Table; /* * This is our model class and it corresponds to Customer table in database */ @Entity @Table(name="CUSTOMER") public class Customer{ @Id @Column(name="id") @GeneratedValue(strategy=GenerationType.IDENTITY) int id; @Column(name="customerName") String customerName; @Column(name="email") String email; public Customer() { super(); } public Customer(String customerName,String email) { super(); this.customerName=customerName; this.email=email; } public String getCustomerName() { return customerName; } public void setCustomerName(String customerName) { this.customerName = customerName; } public String getEmail() { return email; } public void setEmail(String email) { this.email = email; } public int getId() { return id; } public void setId(int id) { this.id = id; } } |
@Entity is used for making a persistent pojo class.For this java class,you will have corresponding table in database. @Column is used to map annotated attribute to corresponding column in table.
Create Customer table:
Create customer table in database with following DDL.
CUSTOMER (id int(11) NOT NULL AUTO_INCREMENT,customerName varchar(255) DEFAULT NULL,email varchar(255) DEFAULT NULL,PRIMARY KEY (
id))
Controller class
Step 6: Create a file named “CustomerController.java” in package .org.arpit.java2blog.controller
|
1 2 3 4 5 6 7 8 9 10 11 12 13 14 15 16 17 18 19 20 21 22 23 24 25 26 27 28 29 30 31 32 33 34 35 36 37 38 39 40 41 42 43 44 45 46 47 48 49 50 51 52 53 54 55 56 57 58 59 |
package org.arpit.java2blog.controller; import java.util.List; import org.arpit.java2blog.model.Customer; import org.arpit.java2blog.service.CustomerService; import org.springframework.beans.factory.annotation.Autowired; import org.springframework.ui.Model; import org.springframework.web.bind.annotation.PathVariable; import org.springframework.web.bind.annotation.RequestBody; import org.springframework.web.bind.annotation.RequestMapping; import org.springframework.web.bind.annotation.RequestMethod; import org.springframework.web.bind.annotation.RestController; @RestController public class CustomerController { @Autowired CustomerService customerService; @RequestMapping(value = "/getAllCustomers", method = RequestMethod.GET, headers = "Accept=application/json") public List<Customer> getAllCustomers(Model model) { List<Customer> listOfCustomers = customerService.getAllCustomers(); model.addAttribute("customer", new Customer()); model.addAttribute("listOfCustomers", listOfCustomers); return listOfCustomers; } @RequestMapping(value = "/", method = RequestMethod.GET, headers = "Accept=application/json") public String goToHomePage() { return "redirect:/getAllCustomers"; } @RequestMapping(value = "/getCustomer/{id}", method = RequestMethod.GET, headers = "Accept=application/json") public void getCustomerById(@PathVariable int id) { customerService.getCustomer(id); } @RequestMapping(value = "/addCustomer", method = RequestMethod.POST, headers = "Accept=application/json") public Customer addCustomer(@RequestBody Customer customer) { return customerService.addCustomer(customer); } @RequestMapping(value = "/addCustomer", method = RequestMethod.PUT, headers = "Accept=application/json") public Customer updateCustomer(@RequestBody Customer customer) { return customerService.updateCustomer(customer); } @RequestMapping(value = "/deleteCustomer/{id}", method = RequestMethod.DELETE, headers = "Accept=application/json") public void deleteCustomer(@PathVariable("id") int id) { customerService.deleteCustomer(id); } } |
Service Layer
Step 7: Create a file named “CustomerService.java” in package .org.arpit.java2blog.service
|
1 2 3 4 5 6 7 8 9 10 11 12 13 14 15 16 17 18 19 20 21 22 23 24 25 26 27 28 29 30 31 32 33 34 35 36 37 38 39 40 41 42 43 44 45 46 |
package org.arpit.java2blog.service; import java.util.List; import javax.transaction.Transactional; import org.arpit.java2blog.dao.CustomerDao; import org.arpit.java2blog.model.Customer; import org.springframework.beans.factory.annotation.Autowired; import org.springframework.stereotype.Service; @Service("customerService") public class CustomerService { @Autowired CustomerDao customerDao; @Transactional public List<Customer> getAllCustomers() { return customerDao.getAllCustomers(); } @Transactional public Customer getCustomer(int id) { return customerDao.getCustomer(id); } @Transactional public Customer addCustomer(Customer customer) { customerDao.addCustomer(customer); return customer; } @Transactional public Customer updateCustomer(Customer customer) { customerDao.updateCustomer(customer); return customer; } @Transactional public void deleteCustomer(int id) { customerDao.deleteCustomer(id); } } |
DAO layer
Step 8: Create a interface named “CustomerDao.java” in package .org.arpit.java2blog.dao
|
1 2 3 4 5 6 7 8 9 10 11 12 13 14 15 16 17 18 19 |
package org.arpit.java2blog.dao; import java.util.List; import org.arpit.java2blog.springboot.Customer; public interface CustomerDao { public List<Customer> getAllCustomers() ; public Customer getCustomer(int id) ; public Customer addCustomer(Customer customer); public void updateCustomer(Customer customer) ; public void deleteCustomer(int id) ; } |
Step 9: Create a file named “CustomerDaoImpl.java” in package .org.arpit.java2blog.dao
|
1 2 3 4 5 6 7 8 9 10 11 12 13 14 15 16 17 18 19 20 21 22 23 24 25 26 27 28 29 30 31 32 33 34 35 36 37 38 39 40 41 42 43 44 45 46 47 48 49 50 51 52 53 54 |
package org.arpit.java2blog.dao; import java.util.List; import org.arpit.java2blog.model.Customer; import org.hibernate.Hibernate; import org.hibernate.Session; import org.hibernate.SessionFactory; import org.springframework.beans.factory.annotation.Autowired; import org.springframework.stereotype.Repository; @Repository public class CustomerDaoImpl implements CustomerDao{ @Autowired private SessionFactory sessionFactory; public void setSessionFactory(SessionFactory sf) { this.sessionFactory = sf; } public List<Customer> getAllCustomers() { Session session = this.sessionFactory.getCurrentSession(); List<Customer> customerList = session.createQuery("from Customer").list(); return customerList; } public Customer getCustomer(int id) { Session session = this.sessionFactory.getCurrentSession(); Customer customer = (Customer) session.get(Customer.class, id); return customer; } public Customer addCustomer(Customer customer) { Session session = this.sessionFactory.getCurrentSession(); session.save(customer); return customer; } public void updateCustomer(Customer customer) { Session session = this.sessionFactory.getCurrentSession(); session.update(customer); } public void deleteCustomer(int id) { Session session = this.sessionFactory.getCurrentSession(); Customer p = (Customer) session.load(Customer.class, new Integer(id)); if (null != p) { session.delete(p); } } } |
AngularJS View
Step 10: Create a file named “customerDataAngularJS.html” in package .src.main.webapp
|
1 2 3 4 5 6 7 8 9 10 11 12 13 14 15 16 17 18 19 20 21 22 23 24 25 26 27 28 29 30 31 32 33 34 35 36 37 38 39 40 41 42 43 44 45 46 47 48 49 50 51 52 53 54 55 56 57 58 59 60 61 62 63 64 65 66 67 68 69 70 71 72 73 74 75 76 77 78 79 80 81 82 83 84 85 86 87 88 89 90 91 92 93 94 95 96 97 98 99 100 101 102 103 104 105 106 107 108 109 110 111 112 113 114 115 116 117 118 119 120 121 122 123 124 125 126 127 128 129 130 131 132 133 134 135 136 137 138 139 140 141 142 143 144 145 146 147 148 149 150 151 152 153 154 155 156 157 158 159 160 161 162 163 164 165 166 167 168 169 170 171 172 173 174 175 176 177 178 179 180 181 182 183 184 185 186 187 188 189 190 191 192 193 194 195 196 197 198 199 200 201 202 203 204 205 206 207 208 209 210 211 212 213 214 215 216 217 |
<html> <head> <script src="https://ajax.googleapis.com/ajax/libs/angularjs/1.4.4/angular.js"></script> <title>Spring Boot AngularJS example</title> <script type="text/javascript"> var app = angular.module("CustomerManagement", []); //Controller Part app.controller("CustomerController", function($scope, $http) { $scope.customers = []; $scope.customerForm = { id : -1, customerName : "", email : "" }; //Now load the data from server _refreshCustomerData(); //HTTP POST/PUT methods for add/edit customer // with the help of id, we are going to find out whether it is put or post operation $scope.submitCustomer = function() { var method = ""; var url = ""; if ($scope.customerForm.id == -1) { //Id is absent in form data, it is create new customer operation method = "POST"; url = '/addCustomer'; } else { //Id is present in form data, it is edit customer operation method = "PUT"; url = '/addCustomer'; } $http({ method : method, url : url, data : angular.toJson($scope.customerForm), headers : { 'Content-Type' : 'application/json' } }).then( _success, _error ); }; //HTTP DELETE- delete customer by Id $scope.deleteCustomer = function(customer) { $http({ method : 'DELETE', url : '/deleteCustomer/' + customer.id }).then(_success, _error); }; // In case of edit, populate form fields and assign form.id with customer id $scope.editCustomer = function(customer) { $scope.customerForm.customerName = customer.customerName; $scope.customerForm.email = customer.email; $scope.customerForm.id = customer.id; }; /* Private Methods */ //HTTP GET- get all customers collection function _refreshCustomerData() { $http({ method : 'GET', url : 'http://localhost:8080/getAllCustomers' }).then(function successCallback(response) { $scope.customers = response.data; }, function errorCallback(response) { console.log(response.statusText); }); } function _success(response) { _refreshCustomerData(); _clearFormData() } function _error(response) { console.log(response.statusText); } //Clear the form function _clearFormData() { $scope.customerForm.id = -1; $scope.customerForm.customerName = ""; $scope.customerForm.email = ""; }; }); </script> <style> .blue-button { background: #25A6E1; filter: progid: DXImageTransform.Microsoft.gradient( startColorstr='#25A6E1', endColorstr='#188BC0', GradientType=0); padding: 3px 5px; color: #fff; font-family: 'Helvetica Neue', sans-serif; font-size: 12px; border-radius: 2px; -moz-border-radius: 2px; -webkit-border-radius: 4px; border: 1px solid #1A87B9 } .red-button { background: #CD5C5C; padding: 3px 5px; color: #fff; font-family: 'Helvetica Neue', sans-serif; font-size: 12px; border-radius: 2px; -moz-border-radius: 2px; -webkit-border-radius: 4px; border: 1px solid #CD5C5C } table { font-family: "Helvetica Neue", Helvetica, sans-serif; width: 50%; } caption { text-align: left; color: silver; font-weight: bold; text-transform: uppercase; padding: 5px; } th { background: SteelBlue; color: white; } tbody tr:nth-child(even) { background: WhiteSmoke; } tbody tr td:nth-child(2) { text-align: center; } tbody tr td:nth-child(3), tbody tr td:nth-child(4) { text-align: center; font-family: monospace; } tfoot { background: SeaGreen; color: white; text-align: right; } tfoot tr th:last-child { font-family: monospace; } td, th { border: 1px solid gray; width: 25%; text-align: left; padding: 5px 10px; } </style> <head> <body ng-app="CustomerManagement" ng-controller="CustomerController"> <h1>Customer Mart</h1> <form ng-submit="submitCustomer()"> <table> <tr> <th colspan="2">Add/Edit customer</th> </tr> <tr> <td>Customer Name</td> <td><input type="text" ng-model="customerForm.customerName" /></td> </tr> <tr> <td>Email</td> <td><input type="text" ng-model="customerForm.email" /></td> </tr> <tr> <td colspan="2"><input type="submit" value="Submit" class="blue-button" /></td> </tr> </table> </form> <table> <tr> <th>Customer Name</th> <th>Email</th> <th>Operations</th> </tr> <tr ng-repeat="customer in customers"> <td>{{ customer.customerName }}</td> <td>{{ customer.email }}</td> <td><a ng-click="editCustomer(customer)" class="blue-button">Edit</a> | <a ng-click="deleteCustomer(customer)" class="red-button">Delete</a></td> </tr> </table> </body> </html> |
Explanation :
-
- We have injected $http as we have done in ajax example through controller constructor.
|
1 2 3 4 5 6 |
app.controller("CustomerController", function($scope, $http) { $scope.customers = []; ... |
-
- We have defined various methods depending on operations such as editCustomer, deleteCustomer, submitCustomer
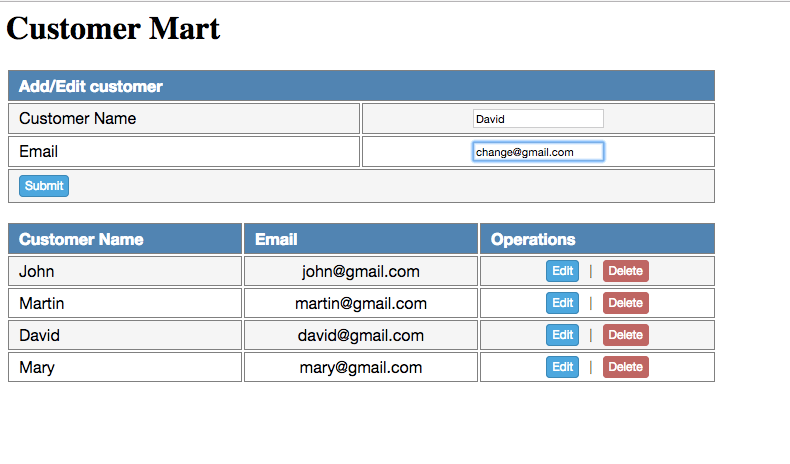
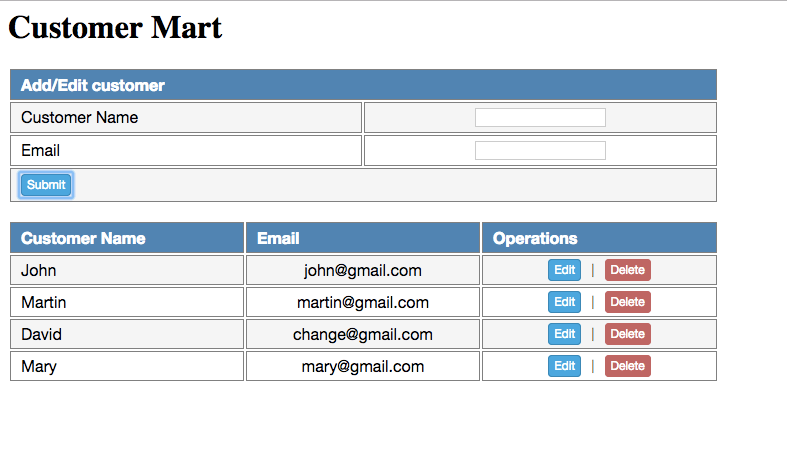
- When you click on submit button on form, it actually calls POST or PUT depending on operation. If you click on edit and submit data then it will be put operation as it will be update on existing resource. If you directly submit data, then it will be POST operation to create new resource,
- Every time you submit data, it calls refereshCustomerData() to refresh Customer table below.
- When you call $http, you need to pass method type and URL, it will call it according, You can either put absolute URL or relative URL with respect to context root of web application.
|
1 2 3 4 5 6 7 8 9 10 11 12 13 14 |
//HTTP GET- get all customers collection function _refreshCustomerData() { $http({ method : 'GET', url : 'http://localhost:8080/getAllCustomers' }).then(function successCallback(response) { $scope.customers = response.data; }, function errorCallback(response) { console.log(response.statusText); }); } } |
Spring boot main file
Step 11: Create a file named “SpringBootAngularJSApplication.java” in package .org.arpit.java2blog
|
1 2 3 4 5 6 7 8 9 10 11 12 13 14 |
package org.arpit.java2blog; import org.springframework.boot.SpringApplication; import org.springframework.boot.autoconfigure.SpringBootApplication; @SpringBootApplication public class SpringBootAngularJSApplication { public static void main(String[] args) { SpringApplication.run(SpringBootAngularJSApplication.class, args); } } |
We have just added @SpringBootApplication and it does all the work.
Let’s understand more about this annotation.
@SpringBootApplication is an annotation that adds all of the following:
@Configuration makes the class as a source of bean definitions for the application context.
@EnableAutoConfiguration enables Spring boot to add beans presents in classpath setting and various property setting.
Normally you would add @EnableWebMvc for a Spring MVC application, but Spring Boot adds it automatically when it sees spring-webmvc on the classpath.
This flags the application as a web application and activates key behaviors such as setting up a DispatcherServlet.
@ComponentScan tells Spring to look for other components, configurations, and services in the default package, allowing it to find the controllers.
If specific packages are not defined, scanning will occur from the package of the class that declares this annotation.
Run the application
Step 12: It ‘s time to do maven build.
Right click on project -> Run as -> Maven build
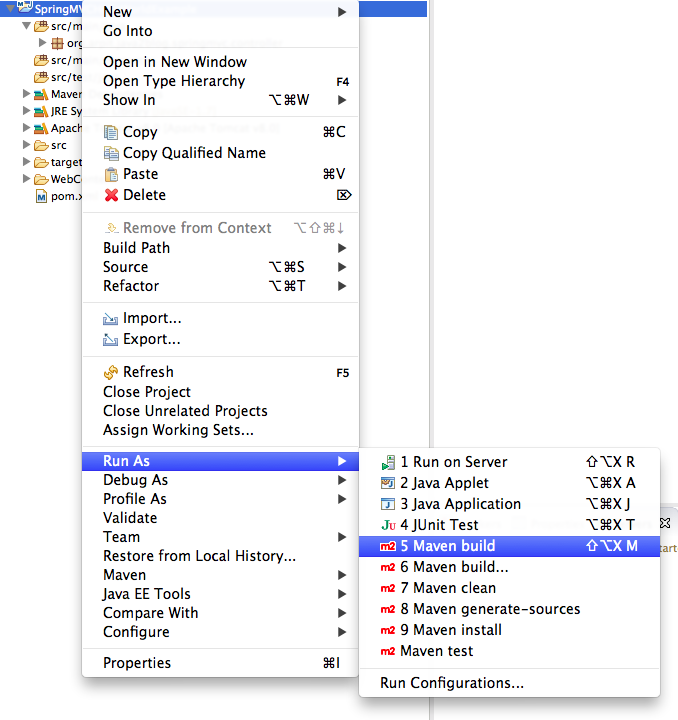
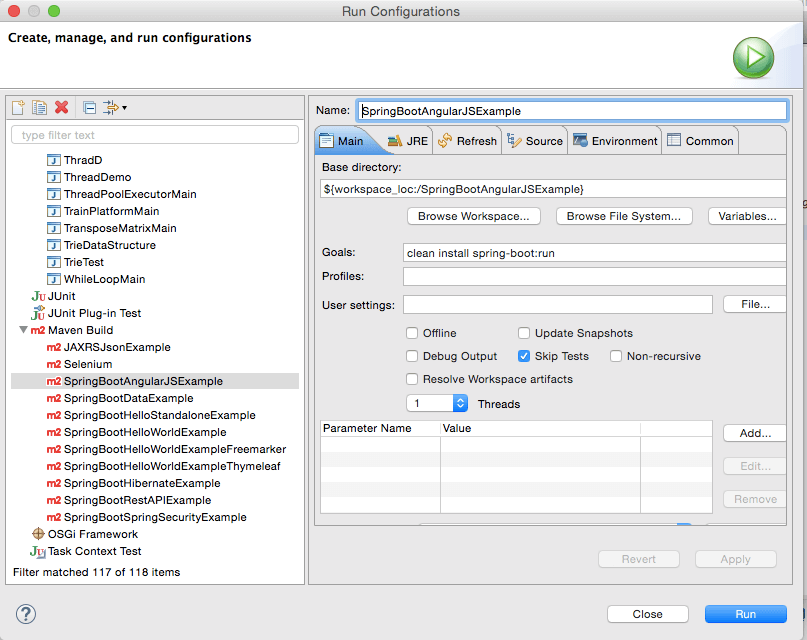
Step 13: Provide goals as clean install spring-boot:run (given below) and click on run
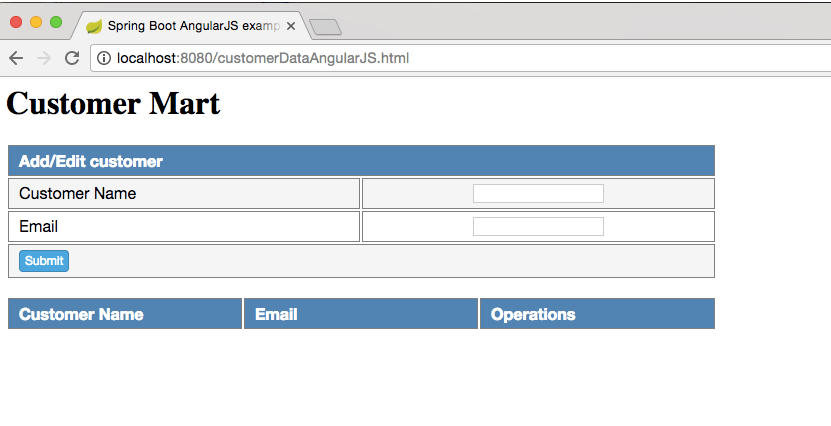
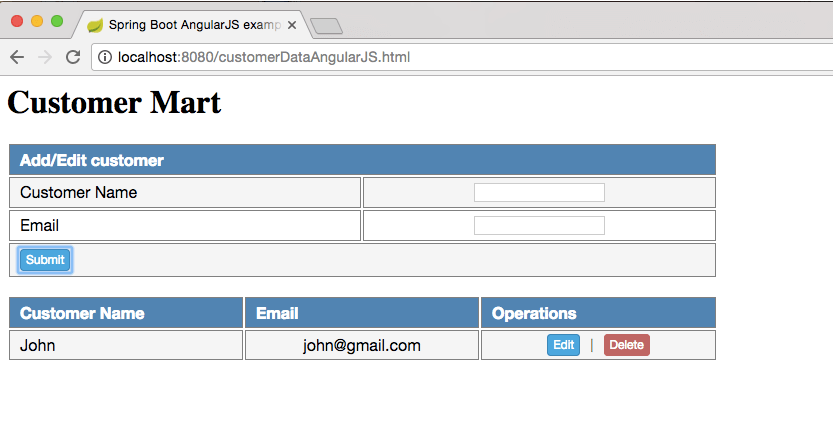
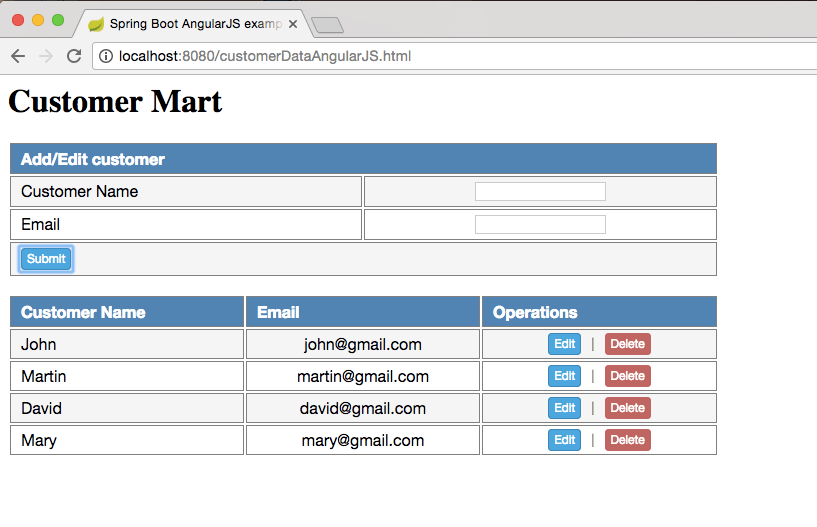
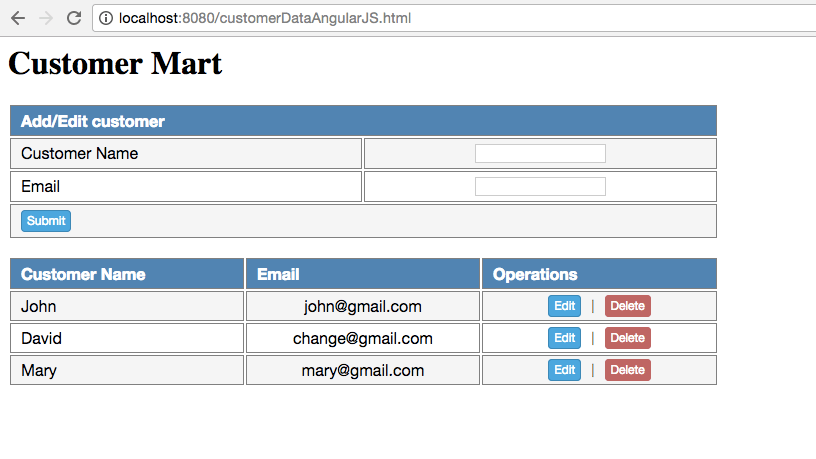
Step 14: Once you are done with Maven build, let’s go to the browser and put following URL.
- Spring tutorial
- Spring MVC tutorial
- Spring boot web application example
- Spring boot hibernate example
- Spring boot interview questions
- Spring interview questions


