Table of Contents
In this post, we are going to see how to create Spring boot application integrating with H2 database.
What is H2 database?
H2 is open source database. It is very fast and smaller in size. It is in-memory database and keeps all data in memory. If you start and stop the application, all the data will be erased as it is not persisted. Although there is an option to persist the data on the disk as well with H2 database.
H2 database is not recommended for production environment and is suitable for small applications which require very simple database.
Tools used
- Spring Boot 2.2.2.RELEASE
- Spring JDBC 5.2.2.RELEASE
- HikariCP 3.4.1
- Maven 3
- Java 8
Github Source code:
Here are steps to create a Spring boot H2 database example.
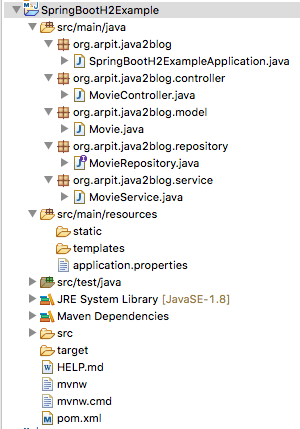
Project Structure
Create new Spring boot project
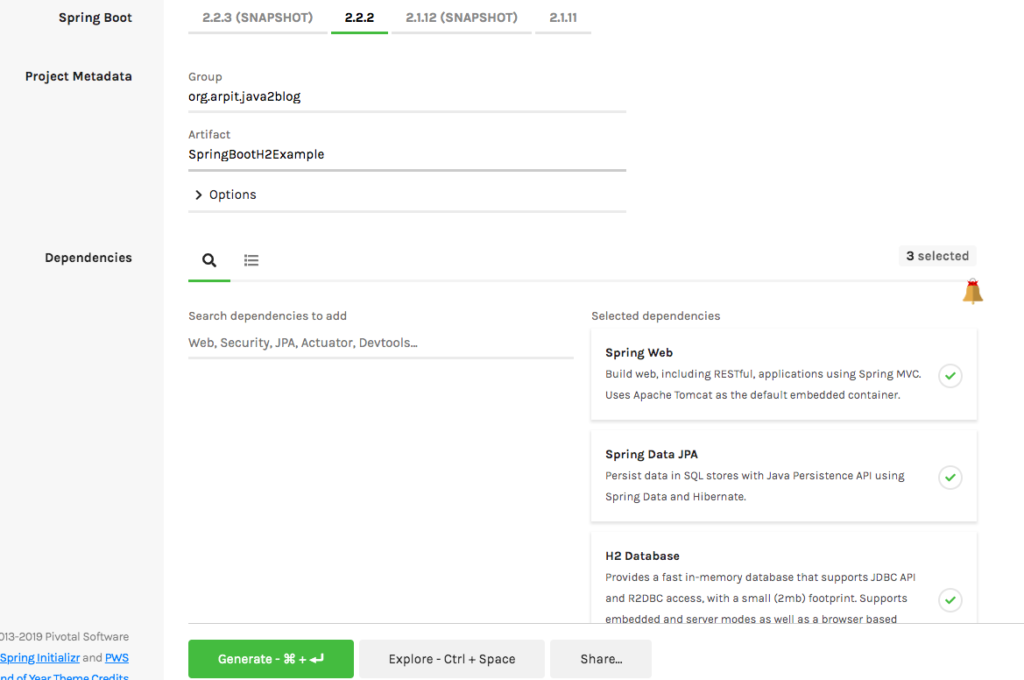
Step 1: Go to start.spring.io and create a project with following dependencies
- Spring web
- H2 database
- Spring data jpa
Here is the screenshot for the same.
Maven configuration
Step 2: You should have pom.xml as below:
|
1 2 3 4 5 6 7 8 9 10 11 12 13 14 15 16 17 18 19 20 21 22 23 24 25 26 27 28 29 30 31 32 33 34 35 36 37 38 39 40 41 42 43 44 45 46 47 48 49 50 51 52 53 54 55 56 57 58 59 60 61 62 63 64 65 |
<?xml version="1.0" encoding="UTF-8"?> <project xmlns="http://maven.apache.org/POM/4.0.0" xmlns:xsi="http://www.w3.org/2001/XMLSchema-instance" xsi:schemaLocation="http://maven.apache.org/POM/4.0.0 https://maven.apache.org/xsd/maven-4.0.0.xsd"> <modelVersion>4.0.0</modelVersion> <parent> <groupId>org.springframework.boot</groupId> <artifactId>spring-boot-starter-parent</artifactId> <version>2.2.2.RELEASE</version> <relativePath /> <!-- lookup parent from repository --> </parent> <groupId>org.arpit.java2blog</groupId> <artifactId>SpringBootH2Example</artifactId> <version>0.0.1-SNAPSHOT</version> <name>SpringBootH2Example</name> <description>Demo project for Spring Boot</description> <properties> <java.version>1.8</java.version> </properties> <dependencies> <dependency> <groupId>org.springframework.boot</groupId> <artifactId>spring-boot-starter-data-jpa</artifactId> </dependency> <dependency> <groupId>org.springframework.boot</groupId> <artifactId>spring-boot-starter-web</artifactId> </dependency> <dependency> <groupId>com.h2database</groupId> <artifactId>h2</artifactId> </dependency> <dependency> <groupId>org.springframework.boot</groupId> <artifactId>spring-boot-starter-test</artifactId> <scope>test</scope> <exclusions> <exclusion> <groupId>org.junit.vintage</groupId> <artifactId>junit-vintage-engine</artifactId> </exclusion> </exclusions> </dependency> <!-- https://mvnrepository.com/artifact/org.springframework.boot/spring-boot-devtools --> <dependency> <groupId>org.springframework.boot</groupId> <artifactId>spring-boot-devtools</artifactId> </dependency> </dependencies> <build> <plugins> <plugin> <groupId>org.springframework.boot</groupId> <artifactId>spring-boot-maven-plugin</artifactId> </plugin> </plugins> </build> </project> |
The spring-boot-starter-parent provides you all maven defaults required for any spring project.
H2 database configuration
As we already know Spring boot is opinionated framework and it will do lots of autoconfigurations based on dependencies available in class path.
In this case, we have H2 dependencies in our classpath, so Spring boot automatically configures some default properties such as URL, username and password.
spring.datasource.driverClassName=org.h2.Driver
spring.datasource.username=sa
spring.datasource.password=
spring.jpa.database-platform=org.hibernate.dialect.H2Dialect
We don’t have to configure anything in case you are fine with these defaults. It uses schema name as testdb.
Can we override defaults?
Oh yes, you can
Override H2 databse defaults
You can always override any property by putting it in application.properties.
For example:
Let’s say you want override property spring.h2.console.enable and want to change it true
You can put this property in application.properties as below.
|
1 2 3 |
spring.h2.console.enable=true |
Model
Step 3: Create model class named Movie.java
|
1 2 3 4 5 6 7 8 9 10 11 12 13 14 15 16 17 18 19 20 21 22 23 24 25 26 27 28 29 30 31 32 33 34 35 |
package org.arpit.java2blog.model; import javax.persistence.Entity; import javax.persistence.GeneratedValue; import javax.persistence.Id; @Entity public class Movie { @Id @GeneratedValue private int id; private String name; private String genre; public int getId() { return id; } public void setId(int id) { this.id = id; } public String getName() { return name; } public void setName(String name) { this.name = name; } public String getGenre() { return genre; } public void setGenre(String genre) { this.genre = genre; } } |
@Entity is used for making a persistent pojo class.For this java class,you will have corresponding table in database.
Repository
Step 4: Create a MovieRepository interface which will extend CrudRepository. We don’t have to provide implementaton, Spring data will autmatically do it for us.
|
1 2 3 4 5 6 7 8 |
package org.arpit.java2blog.repository; import org.arpit.java2blog.model.Movie; import org.springframework.data.repository.CrudRepository; public interface MovieRepository extends CrudRepository<Movie, Integer> {} |
Service
Step 5: Create a service class “MovieService” and autowire MovieRepository in service class.
|
1 2 3 4 5 6 7 8 9 10 11 12 13 14 15 16 17 18 19 20 21 22 23 24 25 26 27 28 29 30 31 32 33 34 35 |
package org.arpit.java2blog.service; import java.util.ArrayList; import java.util.List; import org.arpit.java2blog.model.Movie; import org.arpit.java2blog.repository.MovieRepository; import org.springframework.beans.factory.annotation.Autowired; import org.springframework.stereotype.Service; @Service public class MovieService { @Autowired MovieRepository movieRepository; public List getAllMovies() { List movies = new ArrayList(); movieRepository.findAll().forEach(movie -> movies.add(movie)); return movies; } public Movie getMovieById(int id) { return movieRepository.findById(id).get(); } public void saveOrUpdate(Movie mvoie) { movieRepository.save(mvoie); } public void delete(int id) { movieRepository.deleteById(id); } } |
Controller
Step 6: Create a file named “MovieController.java” in package .org.arpit.java2blog.controller and autowire MovieService in MovieController.
|
1 2 3 4 5 6 7 8 9 10 11 12 13 14 15 16 17 18 19 20 21 22 23 24 25 26 27 28 29 30 31 32 33 34 35 36 37 38 39 40 41 42 |
package org.arpit.java2blog.controller; import java.util.List; import org.arpit.java2blog.model.Movie; import org.arpit.java2blog.service.MovieService; import org.springframework.beans.factory.annotation.Autowired; import org.springframework.web.bind.annotation.DeleteMapping; import org.springframework.web.bind.annotation.GetMapping; import org.springframework.web.bind.annotation.PathVariable; import org.springframework.web.bind.annotation.PostMapping; import org.springframework.web.bind.annotation.RequestBody; import org.springframework.web.bind.annotation.RestController; @RestController public class MovieController { @Autowired MovieService movieService; @GetMapping("/movies") private List getAllMovies() { return movieService.getAllMovies(); } @GetMapping("/movies/{id}") private Movie getMovie(@PathVariable("id") int id) { return movieService.getMovieById(id); } @DeleteMapping("/movies/{id}") private void deleteMovie(@PathVariable("id") int id) { movieService.delete(id); } @PostMapping("/movies") private int saveMovie(@RequestBody Movie movie) { movieService.saveOrUpdate(movie); return movie.getId(); } } |
Spring boot main file
Step 7: Create a file named SpringBootH2ExampleApplication.java in package .org.arpit.java2blog
|
1 2 3 4 5 6 7 8 9 10 11 12 13 14 15 16 |
package org.arpit.java2blog; package org.arpit.java2blog; import org.springframework.boot.SpringApplication; import org.springframework.boot.autoconfigure.SpringBootApplication; @SpringBootApplication public class SpringBootH2ExampleApplication { public static void main(String[] args) { SpringApplication.run(SpringBootH2ExampleApplication.class, args); } } |
We have just added @SpringBootApplication and it does all the work.
Let’s understand more about this annotation.
@SpringBootApplication is an annotation that adds all of the following:
@Configurationmakes the class as a source of bean definitions for the application context.@EnableAutoConfigurationenables Spring boot to add beans present in classpath setting and various property setting.
Normally you would add @EnableWebMvc for a Spring MVC application, but Spring Boot adds it automatically when it sees spring-webmvc on the classpath.
This flags the application as a web application and activates key behaviors such as setting up a DispatcherServlet.
@ComponentScan tells Spring to look for other components, configurations, and services in the default package, allowing it to find the controllers.
If specific packages are not defined, scanning will occur from the package of the class that declares this annotation.
Run the application
Step 8: Let’s start and run the appliation.
Let’s open H2 console now.
- Go to url
http://localhost:8080/h2-console - Click on connect
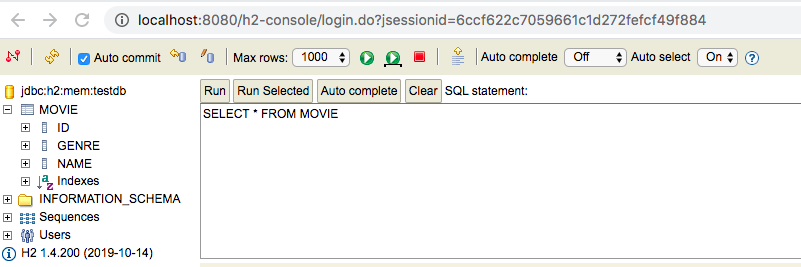
- You should be able to see Movie table as below
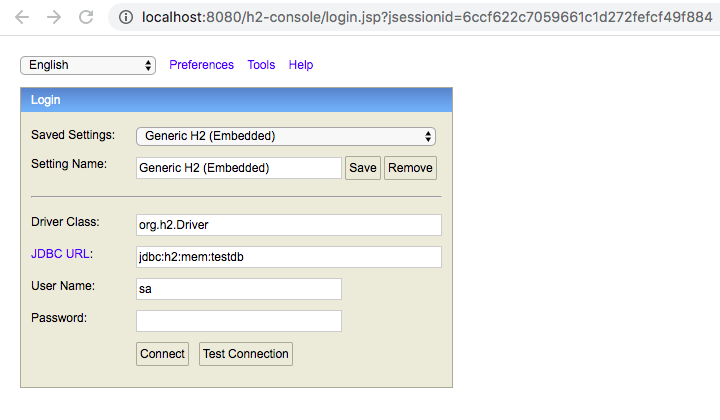
Please make sure JDBC URL is jdbc:h2:mem:testdb
Test the application
Step 9:
We will test this application in postman , UI based client for testing restful web applications. It is chrome plugin. Launch postman.If you want java based client, then you can also use how to send get or post request in java.
Create movie object
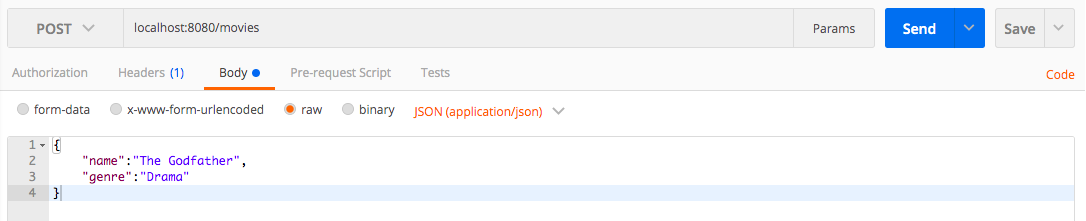
- Launch postman
- Select request type as
Post - Set URL as
http://localhost:8080/movies - Go to header and put
content-type=application/jsonas key value pair - Go to Body,select raw and paste {
“name”: “The Godfather”,
“genre”: “Drama”
} - Click on send
Here is screenshot of H2 database table.
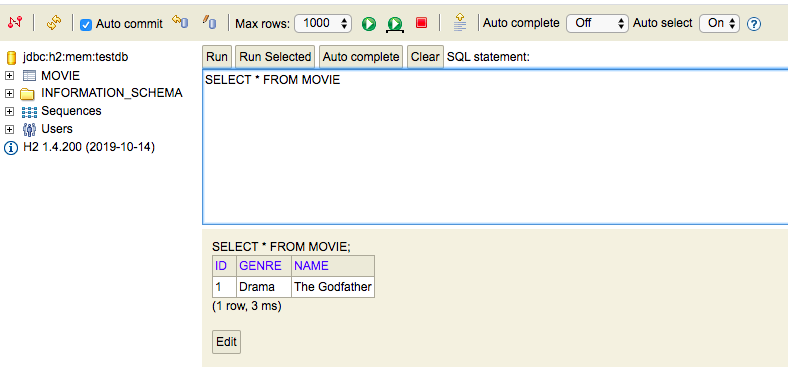
Once you create on send, let’s check if we have entry in H2 database.
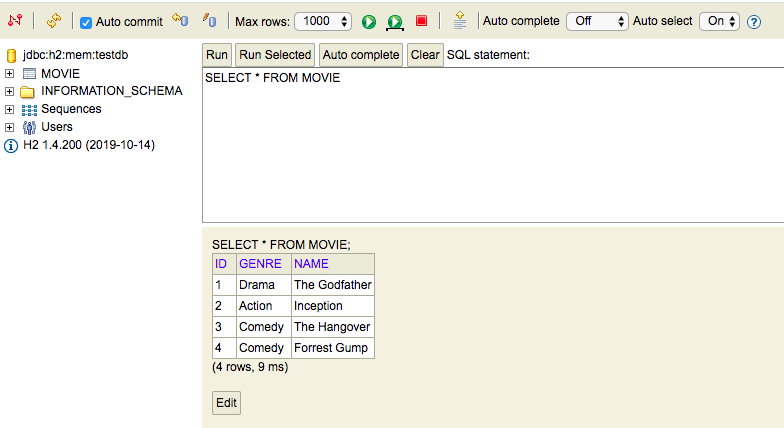
I have created few more movies object with below json with similar post request
“name”:”Inception”,
“genre”:”Action”
}{
“name”:”The Hangover”,
“genre”:”Comedy”
}{
“name”:”Forrest Gump”,
“genre”:”Comedy”
}
Here are records in database after above post requests.
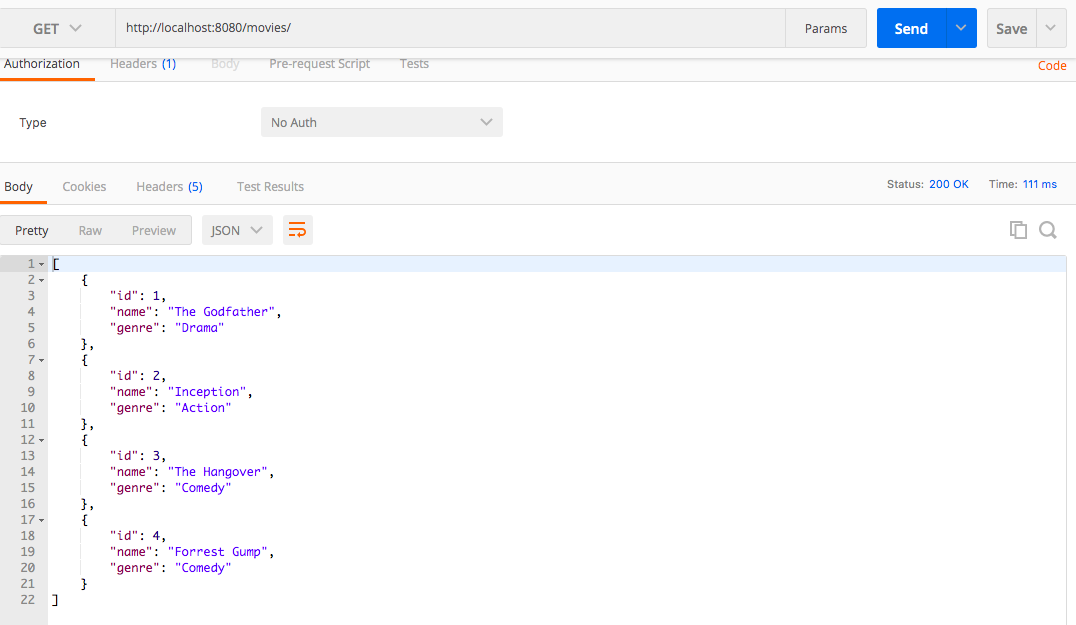
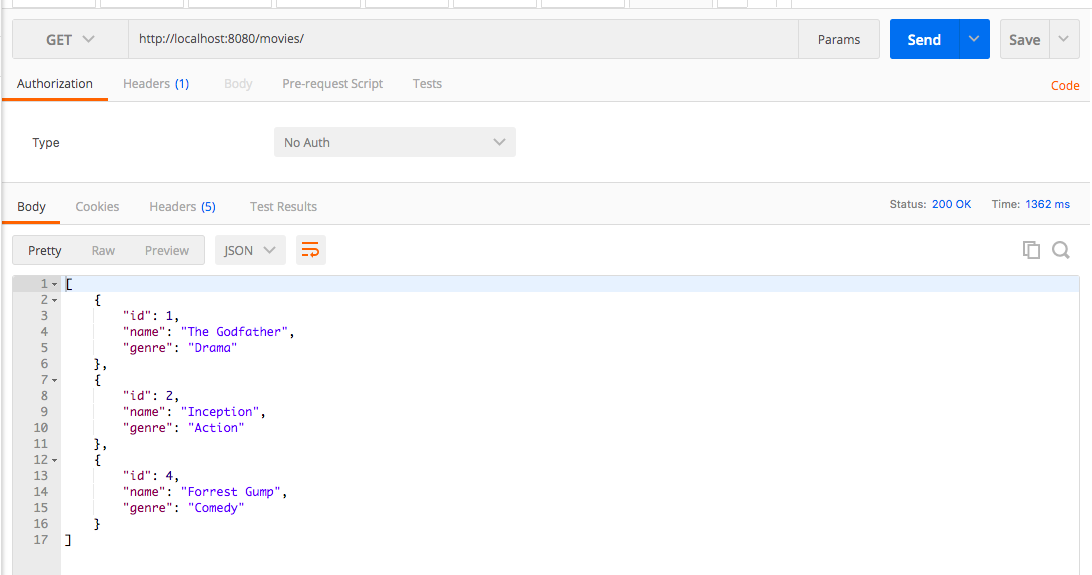
Get all movie objects
- Launch postman
- Select request type as
Get - Set URL as
http://localhost:8080/movies - Click on send
Delete movie id 3
- Launch postman
- Select request type as
Delete - Set URL as
http://localhost:8080/movies/3 - Click on send

Let’s get all the movies again after deleting movie with id 3
That’s all about Spring boot H2 database example