Table of Contents
In this post, we’ll be looking up how to create and use Spring Boot CrudRepository.
SpringBoot CrudRepository provides sophisticated CRUD functionality for the type of entity you want to be managed.This interface acts primarily as a marker interface to capture the types to work with and to help you to discover interfaces that extend this one. It takes the domain class to manage as well as the id type of the domain class as type arguments.
Generally, to use up a CrudRepository you’ll need a database and SpringFramework supports a wide number of them including the most common ones like SQL, MySQL, MongoDB, H2 database and more. Let’s get on with it then.
Tools used
- Java 8+
- Maven 3+
- Spring Boot (the version of your choice we’ll be using v2.2.2.RELEASE but the concepts are valid for 2.x SpringBoot)
- A Database of your choice (We’ll be using MongoDB)
- IDE of your choice (we’ll be using Intellij Idea)
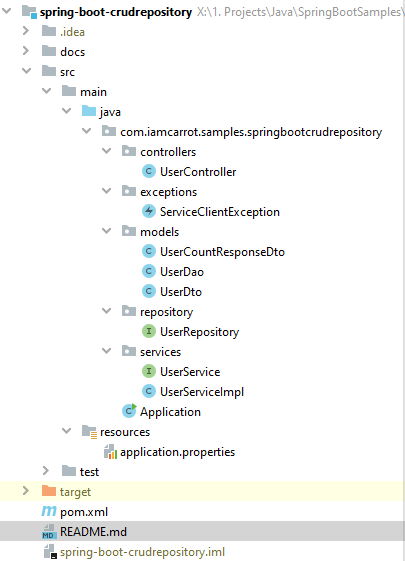
Project Structure:

Let’s get started on the example.
Get a File -> New Project and add necessary dependencies, you can go to Spring Starter IO and
add the below dependencies:
- spring-boot-starter-web
- spring-boot-starter-data-mongodb
After that your pom.xml would look like:
|
1 2 3 4 5 6 7 8 9 10 11 12 13 14 15 16 17 18 19 20 21 22 23 24 25 26 27 28 29 30 31 32 33 34 35 36 37 38 39 40 41 42 43 44 45 46 |
<parent> <groupId>org.springframework.boot</groupId> <artifactId>spring-boot-starter-parent</artifactId> <version>2.2.2.RELEASE</version> <relativePath/> <!-- lookup parent from repository --> </parent> <dependencies> <dependency> <groupId>org.springframework.boot</groupId> <artifactId>spring-boot-starter-web</artifactId> </dependency> <dependency> <groupId>org.springframework.boot</groupId> <artifactId>spring-boot-starter-data-mongodb</artifactId> </dependency> </dependencies> <build> <finalName>${project.artifactId}</finalName> <plugins> <plugin> <groupId>org.springframework.boot</groupId> <artifactId>spring-boot-maven-plugin</artifactId> <executions> <execution> <id>build-info</id> <goals> <goal>build-info</goal> </goals> </execution> </executions> </plugin> </plugins> <resources> <resource> <directory>src/main/resources</directory> <filtering>true</filtering> </resource> </resources> </build> |
Spring basically is a huge umbrella of frameworks and the way it supports multiple databases is leveraging starter
projects and their respective auto-configurations. You can read all about them
here
The [[code]]czoxNDpcInN0YXJ0ZXItcGFyZW50XCI7e1smKiZdfQ==[[/code]] is how spring handles dependency management and solves a few of many problems with transitive dependencies
Wiring up MongoDB
There are a bunch of ways to wire up MongoDb. We’ll be using the MongoURI method with [[code]]czoyNDpcInNwcmluZyBhdXRvY29uZmlndXJhdGlvblwiO3tbJiomXX0=[[/code]] by
setting the relevant properties in our [[code]]czoyMjpcImFwcGxpY2F0aW9uLnByb3BlcnRpZXNcIjt7WyYqJl19[[/code]] file and let spring handle everything else.
For this all you need to define is the [[code]]czo4OlwiTW9uZ29VUklcIjt7WyYqJl19[[/code]] and [[code]]czo2OlwiREJOYW1lXCI7e1smKiZdfQ==[[/code]] in your [[code]]czoyMjpcImFwcGxpY2F0aW9uLnByb3BlcnRpZXNcIjt7WyYqJl19[[/code]] file.
spring.data.mongodb.uri=mongodb://127.0.0.1/
but you can add all sorts of additional settings here including [[code]]czo4OlwidXNlcm5hbWVcIjt7WyYqJl19[[/code]] and [[code]]czo4OlwicGFzc3dvcmRcIjt7WyYqJl19[[/code]] if your DB has them.
spring.data.mongodb.uri=mongodb://127.0.0.1:27017/springCRUDSample?username=TestUser&password=TestPassword&socketTimeoutMS=60000
read more about this.
The Repository Class
Create a new interface called [[code]]czoxNDpcIlVzZXJSZXBvc2l0b3J5XCI7e1smKiZdfQ==[[/code]]
|
1 2 3 4 5 6 |
@Repository public interface UserRepository extends CrudRepository<UserDao, String> { } |
The UserRepository would extend the CrudRepository<T, Y> interface. Here ‘T’ is the class of the entity that needs to be created, read, updated, deleted in/from a database and ‘Y’ the type of the id field of the entity.
The @Repository annotation marks the interface as a Spring Stereotype and spring would provide and implementation for this interface at runtime (reducing boiler-plate database code) read more.
The CrudRepository has basic create, read, update, delete operation methods:
<S extends T> S save(S entity);Saves a given record to the DB<S extends T> Iterable<S> saveAll(Iterable<S> entities);Saves multiple records to the DB.Optional<T> findById(ID id);Finds a record that matches the Idboolean existsById(ID id);Checks if a record exists with the provided IdIterable<T> findAll();Fetches all records from DBIterable<T> findAllById(Iterable<ID> ids);fetches all records that match the provided Idslong count();returns the number of records in the DB.void deleteById(ID id);Deletes the entity with the given id.void delete(T entity);Deletes a given entity.void deleteAll(Iterable<? extends T> entities);Deletes all the records provided.void deleteAll();deletes all records from the DB
Most of the functions are self-explanatory and we’ll look at a few of them in this sample but let’s first talk about
the save and saveAll method.
The Save method
The reason why save gets a whole section is because something that got to me as well when I was in the initial stages
with SpringBoot.
The save and saveAll basically works as an upsert (update or insert). If the object you pass in the save method
has an id (annotated with the @Id in MongoDB UserDao) value, spring would understand that there seems to be
a record in the DB with the same id and will try to find it to perform the update, in case it doesn’t find it Spring
would create a new record and set the id field (in DB) to the value that was present in the id field of the object. In
case the id field is null or empty, spring would treat it as a new record and perform the insert.
id field, if lets say that you don’t have any id field in your database class (DAO) even if you read the record from the DB and call the save() method, spring would consider it as a new record and a Duplicate record would be created. If you have any unique constraints in your database collection they would fail and throw a DuplicateKeyException
The User Entity Class
The UserDao is the class that represents the user record stored in the database.
|
1 2 3 4 5 6 7 8 9 10 11 12 13 14 15 16 17 18 19 20 21 22 23 24 25 26 27 28 29 30 31 32 33 34 35 36 37 38 39 40 41 42 43 44 45 46 47 48 49 50 51 52 53 54 55 56 57 58 |
@Document(collection = "users") public class UserDao { @Id private String userId; @Indexed(unique = true) @Field("username") private String username; @Field("firstName") private String firstName; @Field("lastName") private String lastName; public UserDao() { } public UserDao(UserDto context) { this.userId = context.getUserId(); this.username = context.getUsername(); this.firstName = context.getFirstName(); this.lastName = context.getLastName(); } public UserDao updatedFrom(UserDto context) { if (context.getUsername() != null && !context.getUsername().trim().isEmpty()) this.username = context.getUsername(); if (context.getUsername() != null && !context.getUsername().trim().isEmpty()) this.firstName = context.getFirstName(); if (context.getUsername() != null && !context.getUsername().trim().isEmpty()) this.lastName = context.getLastName(); return this; } public String getUserId() { return userId; } public String getUsername() { return username; } public String getFirstName() { return firstName; } public String getLastName() { return lastName; } } |
The class contains a few fields like userId, username, first name, last name. The userId is the field that represents
the id field of the database and hence is annotated as @Id (that’s how it’s done for MongoDB).
The @Document annotation is another Spring Stereotype that marks the class as a database class and spring would use that class for any data that’s read or written to the users collection (where users is the name of the collection)
The @Field annotation defines the name of the field in the database and maps it to the property. If no field is annotated with @Field then the name of the variable is taken as that of the field name. This is primarily useful when the database record has different names as posed to class fields. e.g. the id field, in the class the id field is userId but when it comes to MongoDB the id field name is _id and that’s what the @Id field does. Alternatively you can use the @Field("_id") instead of the @Id and it’ll work the same.
The @Indexed(unique=true) field is what sets the username field to be unique and no two records can have the same username. The reason why it’s not put over the userId field is because it’s the id field and each DB has it’s id field unique out of the box
The UserDto is just another class that represents the Data Transfer Object returned from the service to the controller. You can look up the file in the GitRepository.
The downside of having the UserDto with almost the same fields is the code repetition and multiple object creation
but if those don’t seem to be a huge trade-off the core advantage this approach gives you is that you have a layer
of adapter in the middle that separates your database fields to that of your API response so that when anything in your DB changes, your API users/clients do not get affected.
Bringing the UserDao and CrudRepository together
How does Spring know what repository to link to which db collection? It’s all with the help of Generics. Spring first resolves CrudRepository<UserDao, String> and pulls out UserDao and looks for a class with that type which is annotated with
@Document, when it finds it, it resolves the annotation for the name of the collection from the
@Document(collection=users) and now it has linked UserRepository to CrudRepository to users collection in the DB.
Service
We’ve wired up our repository and entity class now let’s look at the service that the controller would call to interact.
Below is an implementation of the UserService. The code is trimmed to only the relevant ones. For a complete sample
you should lookup the GitRepository. You can refer to the above section about the CrudRepository methods to know
what method does what
|
1 2 3 4 5 6 7 8 9 10 11 12 13 14 15 16 17 18 19 20 21 22 23 24 25 26 27 28 29 30 31 32 33 34 35 36 37 38 39 40 41 42 43 44 45 46 47 48 49 50 51 52 53 54 55 56 57 58 59 60 61 62 63 64 65 66 67 68 69 70 71 72 73 74 75 76 77 78 79 80 81 82 83 84 85 86 87 88 |
@Service public class UserServiceImpl implements UserService { private final UserRepository userRepository; public UserServiceImpl(UserRepository userRepository) { this.userRepository = userRepository; } @Override public String createUser(UserDto context) throws ServiceClientException { try { UserDao savedUser = userRepository.save(new UserDao(context)); return savedUser.getUserId(); } catch (DuplicateKeyException e) { // handle in case of duplicate username return null; } } @Override public UserCountResponseDto userCount() { long userCount = userRepository.count(); return new UserCountResponseDto(userCount); } @Override public Collection<UserDto> getUsers() { Iterable<UserDao> users = userRepository.findAll(); if (!users.iterator().hasNext()) return null; Collection<UserDto> returner = new ArrayList<>(); users.forEach(x -> returner.add(new UserDto(x))); return returner; } @Override public UserDto getUsers(String userId) throws ServiceClientException { Optional<UserDao> userOptional = userRepository.findById(userId); UserDao user = userOptional.orElse(null); return new UserDto(user); } @Override public Collection<UserDto> getUsersByPet(String petName) { Collection<UserDao> users = userRepository.findByPets(petName); return users.stream().map(UserDto::new).collect(Collectors.toList()); } @Override public boolean updateUser(String userId, UserDto context) throws ServiceClientException { try { UserDao user = userRepository.findById(userId).orElse(null); userRepository.save(user.updatedFrom(context)); return true; } catch (DuplicateKeyException e) { // handle in case of duplicate username } catch (Exception e) { } return false; } @Override public boolean deleteUser(String userId) throws ServiceClientException { userRepository.deleteById(userId); return false; } } |
Notice the delete method, it directly calls the deleteById() and this would work because the userId is the id
field of the database but what if the userId is not the id field of the database? Another way would be read the
user first and then delete that record by passing the instance.
|
1 2 3 4 5 6 7 8 9 |
@Override public boolean deleteUser(String userId) throws ServiceClientException { UserDao existingUser = userRepository.findById(userId).orElse(null); userRepository.delete(existingUser) return false; } |
Controller
Now that we have the services wired up, we just need to add the controllers to actually add an accessible interface
so that the clients can access the functionality that we’ve built here (using APIs). We won’t be covering the basics
of APIs or @RestController in this blog post but you can lookup Spring Boot Rest Exmple
to get more information.
|
1 2 3 4 5 6 7 8 9 10 11 12 13 14 15 16 17 18 19 20 21 22 23 24 25 26 27 28 29 30 31 32 33 34 35 36 37 38 39 40 41 42 43 44 45 46 47 48 49 50 51 52 53 54 55 56 57 58 59 60 61 62 63 64 65 66 67 68 69 70 71 72 73 74 75 76 77 78 79 80 81 82 83 84 85 86 87 88 89 90 91 92 93 94 95 96 97 98 99 100 101 |
@RestController public class UserController { private final UserService userService; public UserController(UserService userService) { this.userService = userService; } @PostMapping("/users") public ResponseEntity<?> createNewUser(@RequestBody UserDto context) { try { String userId = userService.createUser(context); if (userId == null) return ResponseEntity.status(HttpStatus.NOT_MODIFIED).build(); return ResponseEntity.created(URI.create("http://127.0.0.1:8080/users/" + userId)).build(); } catch (ServiceClientException e) { return ResponseEntity.badRequest().header("message", e.getMessage()).build(); } } @GetMapping("/users/count") public ResponseEntity<?> getUsersCount() { UserCountResponseDto userCount = userService.userCount(); if (userCount == null) return ResponseEntity.noContent().build(); return ResponseEntity.ok().contentType(MediaType.APPLICATION_JSON).body(userCount); } @GetMapping("/users") public ResponseEntity<?> getAllUsers() { Collection<UserDto> users = userService.getUsers(); if (users == null || users.isEmpty()) return ResponseEntity.noContent().build(); return ResponseEntity.ok().contentType(MediaType.APPLICATION_JSON).body(users); } @GetMapping("/users/{userId}") public ResponseEntity<?> getAllUsersById(@PathVariable("userId") String userId) { try { UserDto user = userService.getUsers(userId); if (user == null) ResponseEntity.noContent().build(); return ResponseEntity.ok().contentType(MediaType.APPLICATION_JSON).body(user); } catch (ServiceClientException e) { return ResponseEntity.badRequest().header("message", e.getMessage()).build(); } } @PutMapping("/users/{userId}") public ResponseEntity<?> updateUser(@PathVariable("userId") String userId, @RequestBody UserDto context) { try { boolean wasSuccessful = userService.updateUser(userId, context); if (!wasSuccessful) return ResponseEntity.status(HttpStatus.NOT_MODIFIED).build(); return ResponseEntity.ok().build(); } catch (ServiceClientException e) { return ResponseEntity.badRequest().header("message", e.getMessage()).build(); } } @DeleteMapping("/users/{userId}") public ResponseEntity<?> deleteUser(@PathVariable("userId") String userId) { try { boolean wasSuccessful = userService.deleteUser(userId); if (!wasSuccessful) return ResponseEntity.status(HttpStatus.NOT_MODIFIED).build(); return ResponseEntity.ok().build(); } catch (ServiceClientException e) { return ResponseEntity.badRequest().header("message", e.getMessage()).build(); } } } |
The above is a sample snippet of the UserController for the complete code you can refer to the GitHub repository.
The controller must abide to RFC-7231 that states the standards for RESTful APIs.You can see based on the status codes and the create user 201 (with URL) response. During the POST call, the server must return the URL of the resource that was created.
Application class
Here is Application.java which will used to run the code.
|
1 2 3 4 5 6 7 8 9 10 11 12 13 14 15 16 |
package com.iamcarrot.samples.springbootcrudrepository; import org.springframework.boot.SpringApplication; import org.springframework.boot.autoconfigure.SpringBootApplication; import org.springframework.boot.web.servlet.support.SpringBootServletInitializer; @SpringBootApplication public class Application extends SpringBootServletInitializer { public static void main(String[] args) { SpringApplication.run(Application.class, args); } } |
Running the code sample
Now that we have everything ready, we just run our code and try out our APIs. We’ll be using postman to do this.
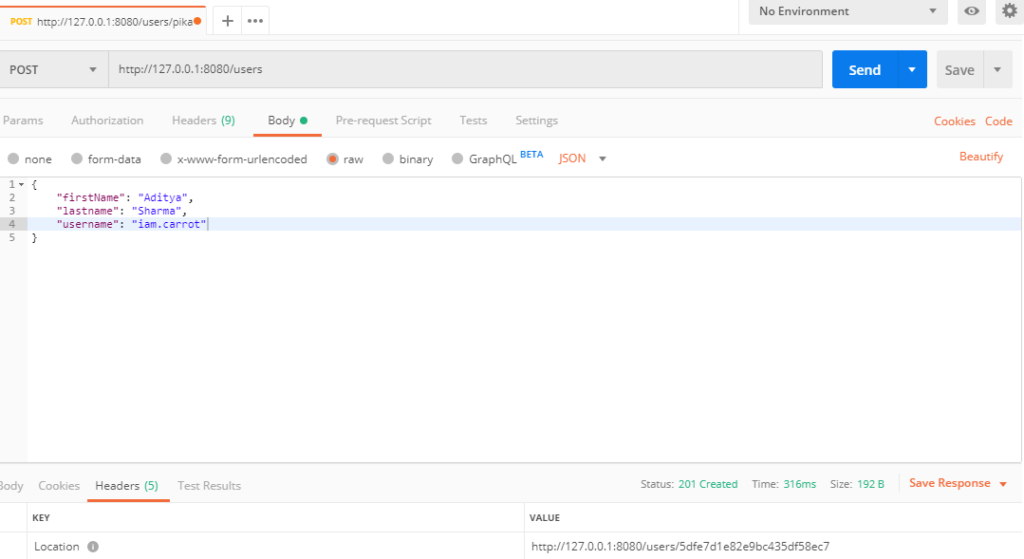
We’ll first make the Post request to create the user:

Notice the Response Headers has a key called Location that is Spring doing its work for obeying RFC-7231 based on the URL we added in the ResponseEntity.created("URL")
Let’s take a look at the DB now, for DB I like to use a tool called Mongo Compass instead of the Terminal, just makes this easier.

The pets and age are basically extra fields I added up. Notice how our userId is stored as ObjectId("OurID") and the actual field name is _id even though in our model class it was userId that’s the @Id doing it’s job.
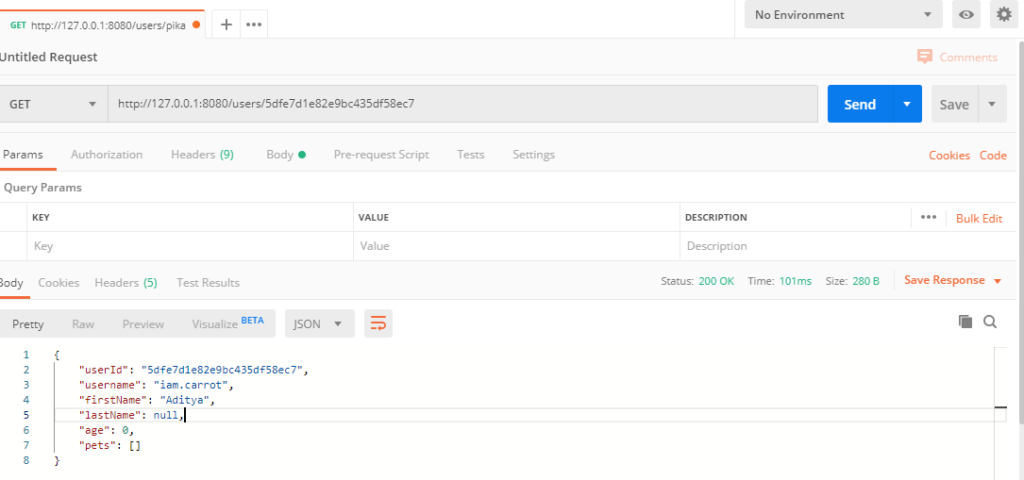
Let’s try to fetch the User information now:

and there you have it.
There are other endpoints registered too and you can call them similarly
| Endpoint | Method Type | Description |
|---|---|---|
| /users/count | GET | to fetch the number of users registered |
| /users | GET | to fetch all users registered |
| /users/{userId} | PUT | to update the data of a user |
| /users/{userId} | DELETE | to delete a user |
Careful about the
GET /userscall though imagine you have 1 million users, would you want to return all of them in a single call? Wouldn’t that be a bit too much for the server to handle? To solve this there is Pagination that I would cover in another blog post as it’s out of scope for this blog post.
Conclusion
We looked at the SpringBoot CrudRepository, it’s methods and a sample service that interacts with the repository.
A lot of code (like Exception Handling, null checks and the controller) were removed from the samples above to bring
more focus on actual methods of the CrudRepository.
Remember the CrudRepository is just a basic out of the box functionality and while it’s a great way to get started you may would want to define your own methods in the UserRepository that would be more bound to your use cases. This is out of scope for this blog post. The deleteById(), findById() and save() they all work on the id field of the database and if you want your own id fields then you can create them and write queries and methods in the UserRepository interface and spring would wire up an implementation for you at runtime.
Source code
That’s all about Spring Boot CrudRepository.


