Table of Contents
In this post , we are going to apply Spring Security on Spring Rest example.
Web services tutorial:
- Introduction to web services
- Web services interview questions
- SOAP web service introduction
- RESTful web service introduction
- Difference between SOAP and REST web services
- SOAP web service example in java using eclipse
- JAX-WS web service eclipse tutorial
- JAX-WS web service deployment on tomcat
- Create RESTful web service in java(JAX-RS) using jersey
- RESTful web service JAXRS json example using jersey
- RESTful web service JAXRS CRUD example using jersey
- AngularJS RESTful web service JAXRS CRUD example using $http
- RESTful Web Services (JAX-RS) @QueryParam Example
- Spring Rest simple example
- Spring Rest json example
- Spring Rest xml example
- Spring Rest CRUD example
Here are steps to create a simple Spring Restful web services with Spring Security which will return json.
1) Create a dynamic web project using maven in eclipse.
|
1 2 3 4 5 6 7 |
<dependency> <groupId>com.fasterxml.jackson.core</groupId> <artifactId>jackson-databind</artifactId> <version>2.4.1</version> </dependency> |
Now change pom.xml as follows:
pom.xml
|
1 2 3 4 5 6 7 8 9 10 11 12 13 14 15 16 17 18 19 20 21 22 23 24 25 26 27 28 29 30 31 32 33 34 35 36 37 38 39 40 41 42 43 44 45 46 47 48 49 50 51 52 53 54 55 56 57 58 59 60 61 62 63 64 65 66 67 68 69 70 71 72 73 74 75 76 77 78 79 80 81 82 83 84 85 86 87 |
<project xmlns="http://maven.apache.org/POM/4.0.0" xmlns:xsi="http://www.w3.org/2001/XMLSchema-instance" xsi:schemaLocation="http://maven.apache.org/POM/4.0.0 http://maven.apache.org/maven-v4_0_0.xsd"> <modelVersion>4.0.0</modelVersion> <groupId>com.arpit.java2blog</groupId> <artifactId>SpringRestSpringSecurityExample</artifactId> <packaging>war</packaging> <version>0.0.1-SNAPSHOT</version> <name>SpringRestSpringSecurityExample Maven Webapp</name> <url>http://maven.apache.org</url> <dependencies> <dependency> <groupId>junit</groupId> <artifactId>junit</artifactId> <version>3.8.1</version> <scope>test</scope> </dependency> <dependency> <groupId>javax.servlet</groupId> <artifactId>javax.servlet-api</artifactId> <version>3.1.0</version> </dependency> <dependency> <groupId>org.springframework</groupId> <artifactId>spring-core</artifactId> <version>${spring.version}</version> </dependency> <dependency> <groupId>org.springframework</groupId> <artifactId>spring-webmvc</artifactId> <version>${spring.version}</version> </dependency> <dependency> <groupId>com.fasterxml.jackson.core</groupId> <artifactId>jackson-databind</artifactId> <version>2.4.1</version> </dependency> <dependency> <groupId>org.springframework.security</groupId> <artifactId>spring-security-core</artifactId> <version>${security.version}</version> </dependency> <dependency> <groupId>org.springframework.security</groupId> <artifactId>spring-security-web</artifactId> <version>${security.version}</version> </dependency> <dependency> <groupId>org.springframework.security</groupId> <artifactId>spring-security-config</artifactId> <version>${security.version}</version> </dependency> </dependencies> <build> <finalName>SpringRestSpringSecurityExample</finalName> <plugins> <plugin> <groupId>org.apache.maven.plugins</groupId> <artifactId>maven-compiler-plugin</artifactId> <version>3.1</version> <configuration> <source>${jdk.version}</source> <target>${jdk.version}</target> </configuration> </plugin> <plugin> <groupId>org.apache.maven.plugins</groupId> <artifactId>maven-war-plugin</artifactId> <configuration> <failOnMissingWebXml>false</failOnMissingWebXml> </configuration> </plugin> </plugins> </build> <properties> <spring.version>4.2.1.RELEASE</spring.version> <security.version>4.0.3.RELEASE</security.version> <jdk.version>1.7</jdk.version> </properties> </project> |
3) Change web.xml as below:
|
1 2 3 4 5 6 7 8 9 10 11 12 13 14 15 16 17 18 19 20 21 22 23 24 25 26 27 28 29 30 31 32 33 34 35 36 37 |
<?xml version="1.0" encoding="UTF-8"?> <web-app xmlns:xsi="http://www.w3.org/2001/XMLSchema-instance" xmlns="http://java.sun.com/xml/ns/javaee" xsi:schemaLocation="http://java.sun.com/xml/ns/javaee http://java.sun.com/xml/ns/javaee/web-app_3_0.xsd" version="3.0"> <display-name>Archetype Created Web Application</display-name> <welcome-file-list> <welcome-file>index.jsp</welcome-file> </welcome-file-list> <servlet> <servlet-name>springrest</servlet-name> <servlet-class> org.springframework.web.servlet.DispatcherServlet </servlet-class> <load-on-startup>1</load-on-startup> </servlet> <servlet-mapping> <servlet-name>springrest</servlet-name> <url-pattern>/</url-pattern> </servlet-mapping> <context-param> <param-name>contextConfigLocation</param-name> <param-value> /WEB-INF/spring-security.xml </param-value> </context-param> <listener> <listener-class>org.springframework.web.context.ContextLoaderListener</listener-class> </listener> <filter> <filter-name>springSecurityFilterChain</filter-name> <filter-class>org.springframework.web.filter.DelegatingFilterProxy</filter-class> </filter> <filter-mapping> <filter-name>springSecurityFilterChain</filter-name> <url-pattern>/*</url-pattern> </filter-mapping> </web-app> |
4) create a xml file named springrest-servlet.xml in /WEB-INF/ folder.
Please change context:component-scan if you want to use different package for spring to search for controller.Please refer to spring mvc hello world example for more understanding.
|
1 2 3 4 5 6 7 8 9 10 11 12 |
<beans xmlns="http://www.springframework.org/schema/beans" xmlns:context="http://www.springframework.org/schema/context" xmlns:mvc="http://www.springframework.org/schema/mvc" xmlns:xsi="http://www.w3.org/2001/XMLSchema-instance" xsi:schemaLocation=" http://www.springframework.org/schema/beans http://www.springframework.org/schema/beans/spring-beans-3.0.xsd http://www.springframework.org/schema/context http://www.springframework.org/schema/context/spring-context-3.0.xsd http://www.springframework.org/schema/mvc http://www.springframework.org/schema/mvc/spring-mvc-3.0.xsd"> <mvc:annotation-driven/> <context:component-scan base-package="org.arpit.java2blog.controller" /> </beans> |
Configure Spring security:
Create a file named spring-security.xml in WEB-INF folder as below:
|
1 2 3 4 5 6 7 8 9 10 11 12 13 14 15 16 17 18 19 20 21 22 23 24 25 26 27 |
<beans:beans xmlns="http://www.springframework.org/schema/security" xmlns:beans="http://www.springframework.org/schema/beans" xmlns:xsi="http://www.w3.org/2001/XMLSchema-instance" xsi:schemaLocation="http://www.springframework.org/schema/beans http://www.springframework.org/schema/beans/spring-beans-4.0.xsd http://www.springframework.org/schema/security http://www.springframework.org/schema/security/spring-security-4.0.xsd"> <http auto-config="true" use-expressions="true"> <intercept-url pattern="/resources/**" access="permitAll" /> <intercept-url pattern="/count*" access="hasRole('ROLE_ADMIN')" /> <logout logout-success-url="/" logout-url="/j_spring_security_logout" /> <csrf disabled="true"/> </http> <authentication-manager> <authentication-provider> <user-service> <user name="java2blog" password="java123" authorities="ROLE_ADMIN" /> </user-service> </authentication-provider> </authentication-manager> </beans:beans> |
You can read more about Spring security to understand above configuration better. When user will try to access countries or country/{id} url, he will get login form and he need to put correct credentials (Username : java2blog and password= java123) to access Spring Rest APIs.
Create bean class
5) Create a bean name “Country.java” in org.arpit.java2blog.bean.
|
1 2 3 4 5 6 7 8 9 10 11 12 13 14 15 16 17 18 19 20 21 22 23 24 25 26 27 28 |
package org.arpit.java2blog.bean; public class Country{ int id; String countryName; public Country(int i, String countryName) { super(); this.id = i; this.countryName = countryName; } public int getId() { return id; } public void setId(int id) { this.id = id; } public String getCountryName() { return countryName; } public void setCountryName(String countryName) { this.countryName = countryName; } } |
Create controller
6) Create a controller named “CountryController.java”
|
1 2 3 4 5 6 7 8 9 10 11 12 13 14 15 16 17 18 19 20 21 22 23 24 25 26 27 28 29 30 31 32 33 34 35 36 37 38 39 40 41 42 43 44 45 46 47 48 49 50 51 52 53 54 |
package org.arpit.java2blog.controller; import java.util.ArrayList; import java.util.List; import org.arpit.java2blog.bean.Country; import org.springframework.web.bind.annotation.PathVariable; import org.springframework.web.bind.annotation.RequestMapping; import org.springframework.web.bind.annotation.RequestMethod; import org.springframework.web.bind.annotation.RestController; @RestController public class CountryController { @RequestMapping(value = "/countries", method = RequestMethod.GET,headers="Accept=application/json") public List getCountries() { List listOfCountries = new ArrayList(); listOfCountries=createCountryList(); return listOfCountries; } @RequestMapping(value = "/country/{id}", method = RequestMethod.GET,headers="Accept=application/json") public Country getCountryById(@PathVariable int id) { List listOfCountries = new ArrayList(); listOfCountries=createCountryList(); for (Country country: listOfCountries) { if(country.getId()==id) return country; } return null; } // Utiliy method to create country list. public List createCountryList() { Country indiaCountry=new Country(1, "India"); Country chinaCountry=new Country(4, "China"); Country nepalCountry=new Country(3, "Nepal"); Country bhutanCountry=new Country(2, "Bhutan"); List<Country> listOfCountries = new ArrayList<gt;(); listOfCountries.add(indiaCountry); listOfCountries.add(chinaCountry); listOfCountries.add(nepalCountry); listOfCountries.add(bhutanCountry); return listOfCountries; } } |
@PathVariable: Used to inject values from the URL into a method parameter.This way you inject id in getCountryById method .
We are not providing any view information in springrest-servlet.xml as we do in Spring MVC. If we need to directly get resource from controller, we need to return @ResponseBody as per Spring 3 but with Spring 4, we can use @RestController for that.
In spring 4.0, we can use @RestController which is combination of @Controller + @ResponseBody.
|
1 2 3 |
@RestController = @Controller + @ResponseBody |
6) It ‘s time to do maven build.
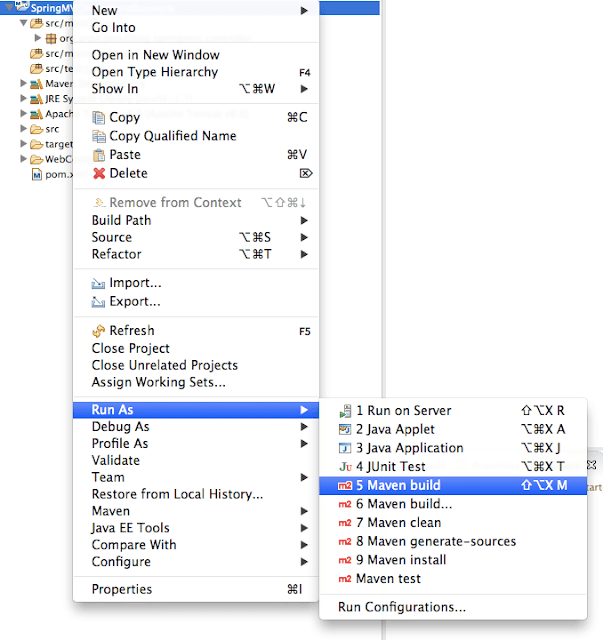
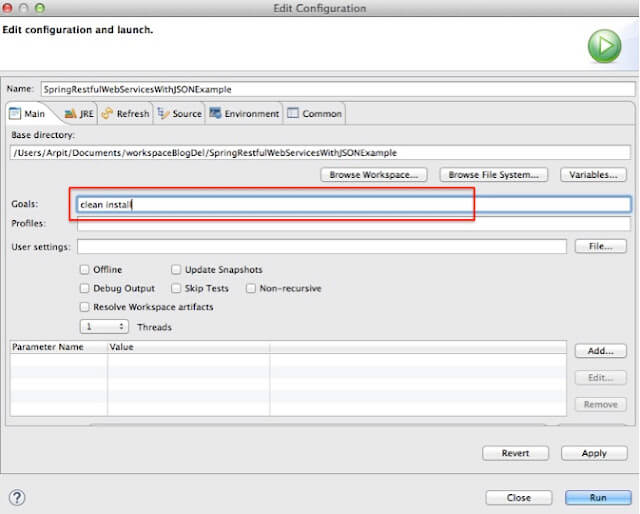
Run the application
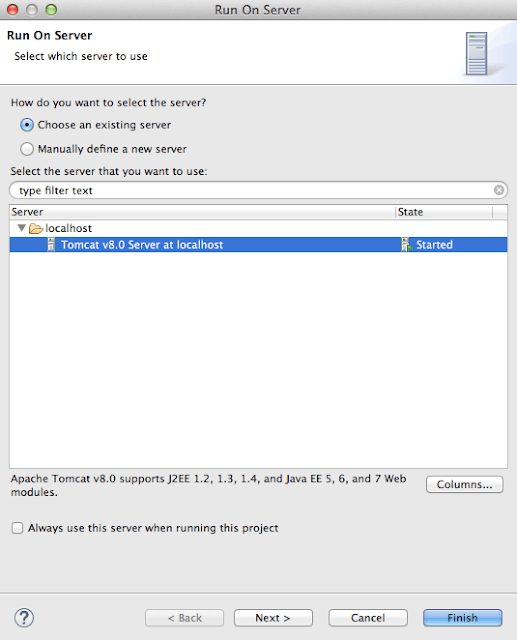
When you run the application, you might get this kind of warning
|
1 2 3 4 |
Mar 26, 2016 1:45:51 AM org.springframework.web.servlet.PageNotFound noHandlerFound WARNING: No mapping found for HTTP request with URI [/SpringRestfulWebServicesWithJSONExample/] in DispatcherServlet with name 'SpringRestfulWebServicesWithJSONExample' |
Please ignore above warning. When you start application, you have below URL if you have not provided start page:
http://localhost:8080/SpringRestSpringSecurityExample/
As we have used DispatcherServlet in web.xml, this request goes to spring DispatcherServlet and it did not find the corresponding mapping in controller , hence you get that warning.
9) Test your REST service under: “http://localhost:8080/SpringRestSpringSecurityExample/countries”.
When you try to access above URL, you will get login page as below
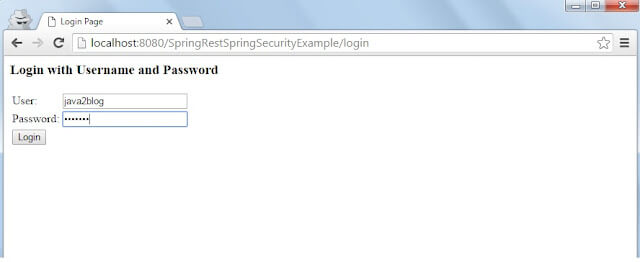
If you put correct username and password, you will get below page:
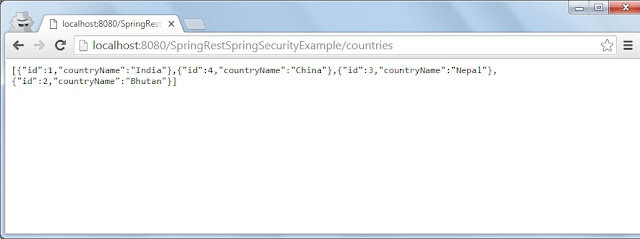
If you getting 404 error with above steps, you may need to follow below steps:
1) If you are getting this warning into your Tomcat startup console log, then it can cause the issue
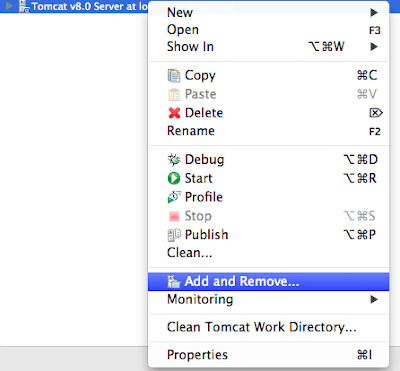
- Go to server view
- Double click on your tomcat server. It will open the server configuration.
- Under server options check ‘Publish module contents to separate XML files’ checkbox.
- Restart your server. This time your page will come without any issues.
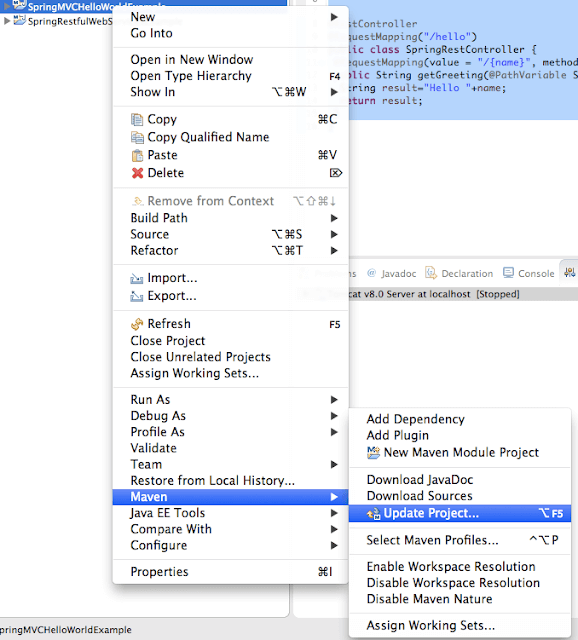
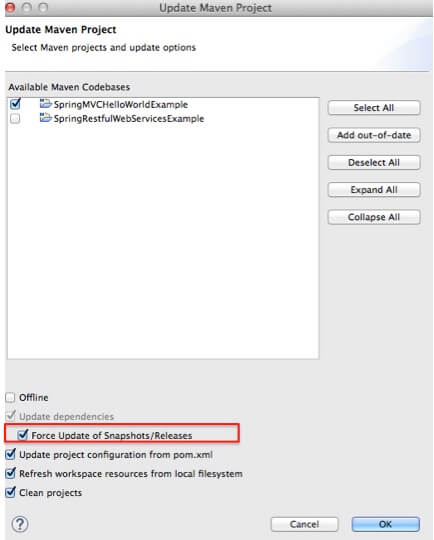
This should solve you issues.


