Using New-Item Cmdlet
To create a shortcut on Desktop using PowerShell:
- Use the
GetFolderPath()method to define the shortcut’s path and name. - Define the shortcut’s target path.
- Use the
New-Itemcmdlet to create a.lnkfile of the target path.
You must open PowerShell as an Administrator to run the following script.
|
1 2 3 4 5 |
$shortcutPath = "$([Environment]::GetFolderPath('Desktop'))\calcShortcut.lnk" $targetPath = "C:\Windows\System32\calc.exe" New-Item -ItemType SymbolicLink -Path $shortcutPath -Target $targetPath |
|
1 2 3 4 5 6 |
Directory: C:\Users\John\Desktop Mode LastWriteTime Length Name ---- ------------- ------ ---- la--- 26/04/2023 7:43 AM 0 calcShortcut.lnk -> C:\Windows\System32\calc.exe |
First, we defined the $shortcutPath variable and assigned a string value. This string value contained the full path and the shortcut filename with the .lnk extension, which will be created on the current user’s Desktop. Then, we used the GetFolderPath() of the Environment class to retrieve the path of the Desktop folder for the current user, while calcShortcut.lnk is the name of the shortcut, which was appended to the end of the Desktop‘s path.
Next, we defined another variable called $targetPath, having the target of the shortcut. It means it is the path to the application or program we wanted to create a shortcut. So, for example, the $targetPath in the above example points to the Windows Calculator app because we wanted to make its shortcut on the current user’s Desktop folder.
Finally, we used the New-Item cmdlet to create a new symbolic link (.lnk). The -ItemType parameter was set to the SymbolicLink, indicating a symbolic link file would be created. The -Path and -Target parameters were set to $shortcutPath and $targetPath variables.
The $shortcutPath represented the full path and name of the shortcut file that would be created, while the $targetPath denoted the full path and name of the target file for the shortcut.
After executing the New-Item cmdlet with -ItemType, -Path, and -Target parameters, we would have a shortcut file named calcShortcut.lnk on the Desktop folder, pointing to the Windows Calculator app living in C:\Windows\System32 directory.
Using WScript.Shell COM Object
To create a shortcut on Desktop using PowerShell:
- Create a
WScript.Shellobject using theNew-Objectcmdlet. - Use the
GetFolderPath()method to define the shortcut’s path and name. - Define the shortcut’s target path.
- Create a shortcut file using the
CreateShortcut()method. - Use the
TargetPathproperty to set the name and location of a target file for the shortcut. - Use the
Save()method to save changes made to the shortcut object.
|
1 2 3 4 5 6 7 8 |
$wshShellObj = New-Object -ComObject WScript.Shell $shortcutPath = "$([Environment]::GetFolderPath('Desktop'))\calcShortcut.lnk" $targetPath = "C:\Windows\System32\calc.exe" $shortcut = $wshShellObj.CreateShortcut($shortcutPath) $shortcut.TargetPath = $targetPath $shortcut.Save() |
The above script will not display any output or error but create a shortcut on the specified location. Here, we used the New-Object cmdlet to create an instance of the WScript.Shell class and stored it in the $wshShellObj variable. Note that the New-Object cmdlet can be used to create an object (instance) of the COM object or a .NET framework; we created a COM object because we used the -ComObject parameter with the New-Object cmdlet.
What is the COM object, and why did we use the -ComObject parameter? The -ComObject parameter specifies the ProgID (programmatic identifier) of the COM (Component Object Model) object; here, the ProgID is WScript.Shell. We used this parameter to instantiate the COM object and use its properties and methods to communicate with the object and perform various jobs specific to that object. How?
For example, we created an instance of the WScript.Shell class, stored in $wshShellObj, which we used to access the CreateShortcut() method of the $wshShellObj object.
Next, we used the GetFolderPath() method of the Environment class to get the current user’s Desktop path and appended the name of the shortcut file (calcShortcut.lnk) at the end of this path. After that, we assigned this path to the $shortcutPath variable. Similarly, we defined the $targetPath variable containing the path of a program/application for which we wanted to create a shortcut.
Then, we used the CreateShortcut() method of the $wshShellObj object to create a shortcut file. To do that, we passed $shortcutPath as an argument and stored the returned value in the $shortcut variable. Next, we set the TargetPath property of the $shortcut to the $targetPath and used the Save() method to save the modifications we made to the shortcut object.
This way, the calcShortcut.lnk shortcut file will be created on the desktop, pointing to the Windows Calculator application living in the `C:\Windows\System32 directory.
Using Context Menu
Following the below steps to create a shortcut on the current user’s Desktop using the context menu.
-
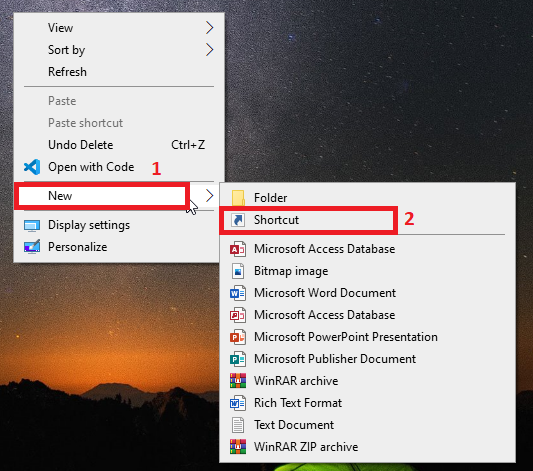
Right-Click on an empty desktop area, point to
Newon the context menu and selectShortcutfrom the sub-menu as demonstrated below.
-
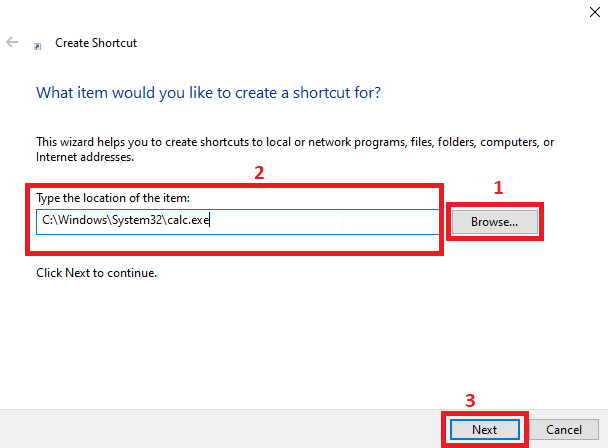
Click
Browse(step-1) to browse your target application for which you want to create a shortcut on theDesktop. For example, we wanted to create a shortcut for the Windows Calculator application, so we selected that. Next, ensure you have chosen the correct path for your target application (step-2). Then, click theNextbutton (step-3).
-
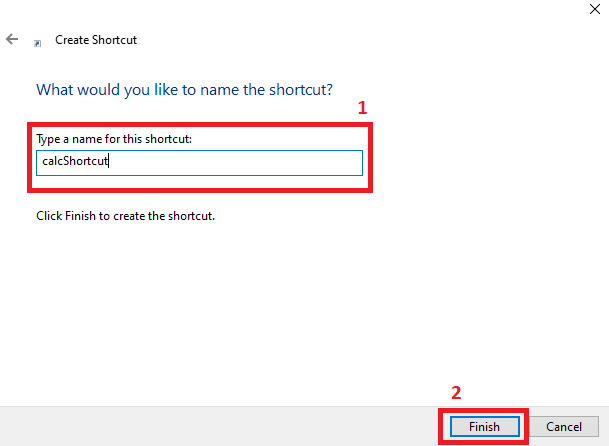
Name the shortcut file (step-1) and hit
Finish(step-2). Now, navigate to theDesktopfolder to use thecalcShortcutshortcut for the Windows Calculator application.
That’s all about PowerShell create shortcut on Desktop.


