
Table of Contents
- Using the .convert() function from the Pillow Imaging Library (Fork) to convert image to grayscale in Python.
- Using the OpenCV library functions to convert image to grayscale in Python.
- Using the color.rgb2gray() function from the scikit-image module to convert image to grayscale in Python.
- Using the Conversion Formula along with the matplotlib library to convert image to grayscale in Python.
A grayscale image is an image that simply contains only the shades of gray and no other color. The main advantage of using a grayscale image over a colored image is that it brings down the computational requirements, increases the speed of processing, and makes a significant impact on the complexity of the algorithm.
This tutorial discusses the different ways available to convert image to grayscale in Python.
Using the .convert() function from the Pillow Imaging Library (Fork) to convert image to grayscale in Python.
The Pillow Imaging Library is an open-source additional library that can be added to Python and is utilized for providing the functions that help in the opening, saving, and manipulating different image file formats in Python. This library is available on all Windows, Linux, and MacOS X.
The .convert() function takes an image as its parameter and is utilized to convert the given image into an image type that the user specifies in its mode parameter.
The .convert() function provides different modes for the process of conversion of an image to grayscale in Python. Below are the modes that are usable for this process.
- 1 : It can be defined as a true black and white image mode that only has a 1-bit channel and takes only two values, either full black or full white.
- L : It is an abbreviation for Luminance Channel. It is an 8-bit B&W/grayscale image mode. It usually takes up any value in the range of 0 to 255, which represents all the colors that are white, black with all the shades of gray in between them.
- LA : An abbreviation for Luminance with Alpha Transparency Channel. It is utilized when the converted image needs to be successfully converted with transparency. This mode only provides support for images with the
.pngand the.giffile extensions.
The following code uses the .convert() function from the Pillow Imaging Library (Fork) to convert image to grayscale in Python.
|
1 2 3 4 5 6 |
from PIL import Image orig = Image.open('ocean.jpg') gsi = img.convert('L') gsi.save(oceangray.jpg) |
Explanation
- The original image is opened and stored as
origin the Python code using theImage.open()function. - The image is converted to grayscale and stored in the variable
gsi. In this code, we use the 8-bitLmode. - Finally, the picture stored in the variable
gsiis saved and stored on to the system.
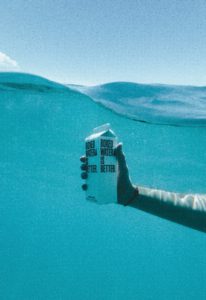
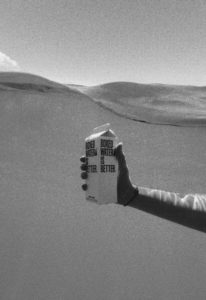
The above code converts a colored image into a grayscale image. Here is a comparison between both the pictures.
Original Image :
Converted Image (After grayscale):
Using the OpenCV library functions to convert image to grayscale in Python.
Another method to convert an image to grayscale is with the use of several functions from the OpenCV library. OpenCV is an enormous library that provides functions that are used for Machine learning, Computer Vision, and Image Processing. It is supported not only by Python but also other languages like Java, C++, etc.
OpenCV provides several functions for image processing which are used here to convert the given image to grayscale. The module is not in-built and needs to be imported to the Python code to successfully run the code without any errors.
The following code uses the OpenCV library functions to convert image to grayscale in Python.
|
1 2 3 4 5 6 7 |
import cv2 orig = cv2.imread('ocean.jpg') cv2.imshow('Original',orig) gsi = cv2.cvtColor(orig, cv2.COLOR_BGR2GRAY) cv2.imshow('Grayscale', gsi) |
The output of the code would be the same as that of the method mentioned in the article above.
Explanation
- The
OpenCVmodule orcv2is imported to the Python code first. - The original image is first loaded to the program code using the
imread()function. - The loaded image is then converted to grayscale with the help of the
.cvtColor()function. - The converted file is then stored on the disk with the help of the
imwrite()function.
Using the color.rgb2gray() function from the scikit-image module to convert image to grayscale in Python.
scikit-image is an open-source and free-to-use library that provides various functions only for the purpose of image processing in Python. The color and io sub-modules from the skimage module need to be imported to the Python code in order to use the color.rgb2gray() function.
The color.rgb2gray() function is utilized to take an image in the RGB format as an argument and return a grayscale copy of the original image.
The following code uses the color.rgb2gray() function from the scikit-image module to convert image to grayscale in Python.
|
1 2 3 4 5 6 |
from skimage import color from skimage import io orig = io.imread('ocean.jpg') gsi = color.rgb2gray(orig) |
The output of the above code would be the same as the other codes mentioned above in the article.
Explanation
colorandioare imported from theskimagemodule to run the code without any errors.- The
io.imread()function is utilized to load the original image to the Python code. - The
color.rgb2gray()function takes in the original image and returns a grayscale image to the Python code, which is stored in the variablegsi.
Using the Conversion Formula along with the matplotlib library to convert image to grayscale in Python.
There exists a standard conversion formula for converting images in RGB format to grayscale directly. The determined formula for this is gsi = 0.2989 * R + 0.5870 * G + 0.1140 * B.
Along with the standard conversion formula, we also need to use and import the matplotlib library in order to successfully implement this method.
Matplotlib is a cross-platform library that is mainly used for graphical plotting and data visualization in Python and the NumPy library which is an extension of Python.
The following code uses the Conversion Formula along with the matplotlib library to convert image to grayscale in Python.
|
1 2 3 4 5 6 7 8 9 |
from matplotlib import pyplot as plt import matplotlib.image as mpimg orig = mpimg.imread('ocean.jpg') R, G, B = orig[:,:,0], orig[:,:,1], orig[:,:,2] gsi = 0.2989 * R + 0.5870 * G + 0.1140 * B plt.imshow(gsi, cmap='gray') plt.show() |
The output of the above code would be the same as the other codes mentioned above in the article.
Explanation
- The
matplotlibmodule is imported to the Python code to successfully run the code without any errors in Python. - The image is loaded to the code using the
mpimg.read()function. - Then, the dimension matrices of the RGB image are taken.
- Then, the given conversion formula is applied to the dimension matrices in order to convert the image to grayscale.
- The converted image is then stored and shown using the
plt.imshow()function.
That’s all about how to convert image to grayscale in Python.