Table of Contents
This article will explain how to write an array to a CSV file in PowerShell.
Using the Export-Csv cmdlet
The Export-Csv cmdlet in PowerShell creates a CSV file of the given objects. But you cannot directly write an array to a CSV file correctly.
When you pipe the array to Export-Csv, the result will be similar to this.

The best way of exporting an array to a CSV file is to:
- Create a PSObject from an array
- Store PSObject in a new array
- Pipe a new array to the
Export-Csvcmdlet
|
1 2 3 4 5 6 7 8 9 10 11 12 13 14 15 16 |
$array = @('Chris', '24', 'Police'), ('Tom', '27', 'Farmer'), ('Anthony', '29', 'Lawyer') $newarr = @() $columns = @('Name','Age','Job') foreach ($item in $array){ $obj = New-Object PSObject for ($i=0;$i -lt $array.Length; $i++){ $obj | Add-Member -MemberType NoteProperty -Name $columns[$i] -Value $item[$i] } $newarr+=$obj $obj=$null } $newarr | Export-Csv output.csv -NoTypeInformation |
In the above example, we have created the $array to write to a CSV file. The $newarr is an empty array which will be later used to store the PSObject. The $columns contain the heading label for the data.
We created the PSObject $obj using the New-Object cmdlet. Then in for loop, we used Add-Member to add $columns values in the Name property and $array values in the Value property of the PSObject.
The New-Object cmdlet is used to create an instance of a .NET Framework or COM object.
Add-Membercmdlet is used to add custom properties to the PowerShell objects.
After that, we filled $newarr with added data in $obj.
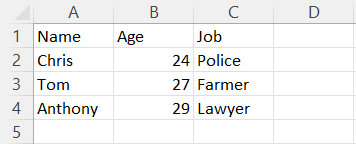
The $newarr contains the following data now.
|
1 2 3 4 5 6 7 |
Name Age Job ---- --- --- Chris 24 Police Tom 27 Farmer Anthony 29 Lawyer |
At last, we piped an array $newarr to the Export-Csv cmdlet and created a CSV file output.csv in the current directory.
The -NoTypeInformation is used to remove the #TYPE information header in a CSV file.
The array is successfully exported to a CSV file.
Using the Set-Content cmdlet
For this method to work, you need to create an array like this:
|
1 2 3 4 5 6 |
$array = @('Name,Age,Job'), ('Chris,24,Police'), ('Tom,27,Farmer'), ('Anthony,29,Lawyer') |
If we use a comma to separate the multiple items, we can write it to a CSV file in the correct format.
To export this array to a CSV, you can use the Set-Content or Add-Content cmdlet.
|
1 2 3 |
$array | Set-Content output.csv |
That’s all about how to write an array to csv in PowerShell. If you have any confusion, let us know in the comments.