In this tutorial, we will see about Jenkins tutorial. Before going to Jenkins, let’s first understand continuous integration.
Table of Contents
What is continuous integration?
- Developer commits code to the shared repository on a regular basis.
- As soon as the new commit is detected, a build will be automatically triggered and tested
- If the build is not successful, developers will be notified.
- If the build is successful, it will be deployed to the server.
Let’s understand this with help of scenario.
Let’s say you are working in large team of 10 developers.
Without continuous integration
Developers were working on different tasks and committed code continuously and built was made after some days(let’s say 20 days) and deployed to the server. There are lots of bugs in the code at time of testing, how will you detect and identify the issue and who might be responsible for this bug?
With continuous integration
All developers are continuous committing the code. With each commit, a build will be triggered and tested and build fails, develop will be notified.In this case, it is very easy to detect and fix the issue.
What is Jenkins?
Jenkins is open source tool for continuous integration and build automation written in java. It is used to manually, periodically or automatically build software development projects. Jenkins can be used by team of different sizes for various projects.
The main function of Jenkins is used to execute predefined steps such as compile java code, build war.You can trigger build on time basis or event basis. for example: every 15 mins or new check in the git.
Some of the steps executed by Jenkins are:
- Build the project with help of maven or gradle.
- Run the test automatically and generate test report.
- Execute any shell script.
- Execute any batch file.
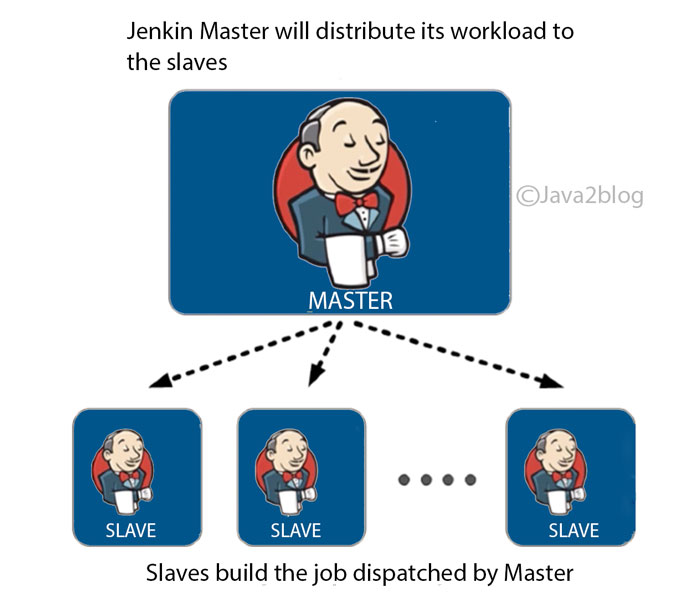
Here is a diagram to demonstrate the functionality of Jenkins.

Why Jenkins is popular?
- Easy to use
- Intuitive web interface
- Good documentation and examples
- Open source
- Extensible
- Support different version control system
- Lots of already built plugins to extend the functionality
- Code quality metrics to assess developers commits.
- Built notifiers in case of any event(e.g. Build failed)
Jenkins ‘s Master and Slave architecture
Master:
- Schedule build jobs
- Distribute the jobs to slaves
- Monitor the slaves and get the build results
- It can also execute build directly
Slave:
- Build the job distributed by Master.
- Jenkins starts a separate program named “slave agent”.When slaves are subscribed to master, master starts distributing work to slaves.
Key terms used in Jenkins
| Term | Descrioption |
|---|---|
| Job/Project | Jenkins seems to use these terms interchangeably. They all refer to runnable tasks that are controlled / managed by Jenkins. |
| Build | Result of one run of a Project. |
| Completed build | A build is completed, if it was started and finished with any result, including failed builds. |
| Successful build | A build is successful when the compilation reported no errors. |
| Broken project | A project is broken if its most recent (completed) build is broken. |
| Slave | Slaves are computers that are set up to build projects for a master. Jenkins runs a separate program called "slave agent" on slaves. When slaves are registered to a master, a master starts distributing loads to slaves. |
| Node | Node is used to refer to all machine that are part of Jenkins grid, slaves and master. |
| Executor | Separated stream of builds to be run on Node in parallel. Node can have 1 or more Executors. Special executors can be created dynamically (one-off executors) to run lightweight jobs used mostly for orchestration purposes. |
| Cloud | Handles creation of Nodes to dynamically expand/shrink the number of slave machines |
Install Jenkins on Mac OS X
You can use guide: install Jenkins on Mac OS X
Please note that you need to install Jenkins before proceeding further, else you will get 404 error at localhost:8080.
Create your first job with Jenkins
Step 1: Go to https://localhost:8080
Step 2: Login with username and password which you might have created while setting Jenkins.
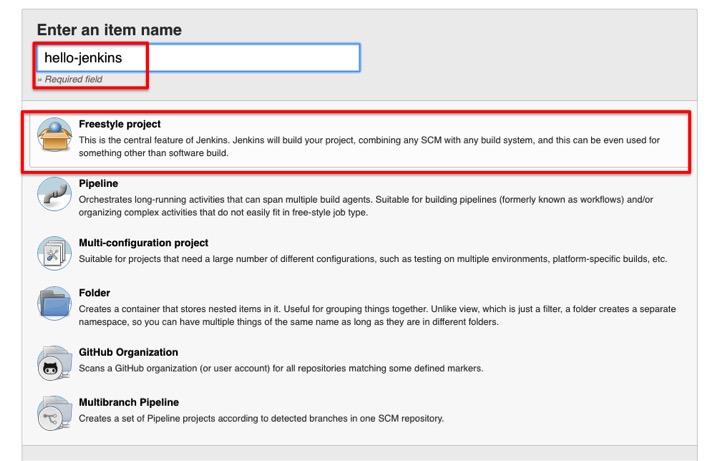
Step 3: Click on “create new jobs”.

Step 4:
Enter item name: hello-jenkins
Click on “Freestyle projects”
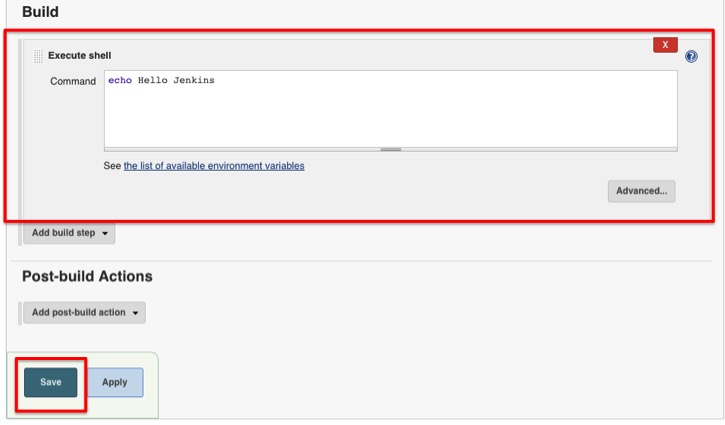
Step 5: Scroll down and go to build section. Select “Execute shell” from dropdown and write “echo Hello Jenkins” in command text box.
step 6: Click on “build now” from left menu.
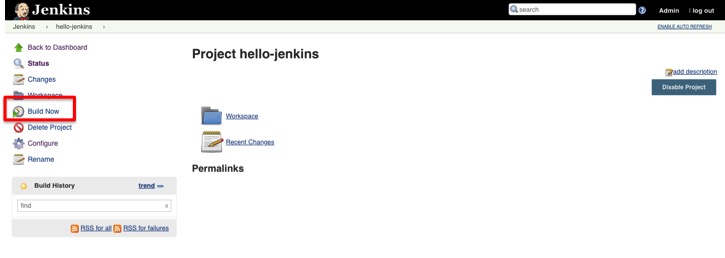
step 7: You will see build history section in left menu. Click on #1 to get more details.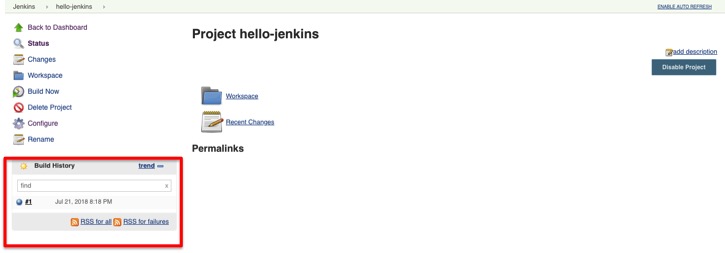
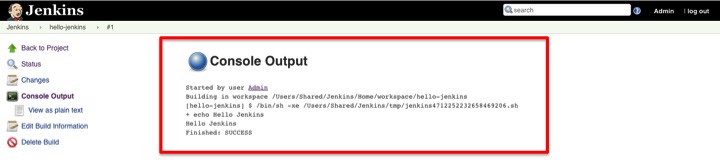
step 8: Click on “Console output” from left menu.You will be able to see the results of the build.
References
https://wiki.jenkins.io/display/JENKINS/Terminology
That’s all about Jenkins tutorial. I hope you will be able to create Jenkins jobs after going through this Jenkins tutorial.